


Companies (e.g., FCM) and users (e.g., proprietary traders) can interact in the TT system by:
- Sharing an account
- Sharing a user
- Sharing accounts with a shared user
- Managing and sponsoring a user
Account Sharing
From the company’s perspective, sharing an account allows a company to create and manage risk in an account that they own while sharing that account with an external client that they do not manage. For example, an FCM can control and manage the risk settings for an omnibus account that is then shared with a buy-side firm. That buy-side firm can create sub-accounts beneath the FCM account which the buy-side then assigns to it’s own traders. In this scenario, the FCM company administrator is only responsible for account creation and management, while the buy-side is responsible for creating and managing users and assigning accounts to those users.
Account sharing rules
When sharing an account as a company administrator, consider the following:
- As an owning administrator you can choose whether it is your name or the client’s name that will appear to the trader routing an order on the account and any sub-accounts accounts. This white-labeling of accounts is sometimes requested by clients.
- You can allow or restrict account permissions for your client. For example, you can restrict the account from being used from the TT mobile application.
- Clients cannot override your risk settings or restrictions or edit your account in any way.
- Shared parent account restrictions (e.q., synthetic orders) are enforced on the child accounts. If needed, the shared-with company can further restrict their own child accounts. For example, if all synthetic orders are allowed on the parent, the child account can restrict TT Iceberg orders.
- You can share accounts with users in other companies via the Accounts | Sharing tab in Setup. You do not have to use the Setup invitation process to share your firms accounts with users in other companies.
- You cannot share an account that has been shared with you by another company.
Account sharing: client impact
As a client, account sharing allows you to manage your own users and control which traders are assigned to an account. Although your traders cannot exceed the risk limits set by the sharing company, you can assign additional risk limits to accounts you create under the sharing companies parent account.
Account sharing: trader impact
As a trader, account sharing allows you to trade with multiple banks or FCMS, etc., while remaining a member of a “company” in the TT system. However, the risk limits are created by the firm who owns the account, so you cannot exceed the risk limits in the shared account as determined by the account owner (e.g., an FCM). You can continue to use the same Trade application workspaces, order book, audit trail, etc. Your user risk limits are configured by your own company.
When sharing accounts between companies and users, both have to be defined in the TT system via the Setup application. Users can trade in the production environment once they have accepted an invitation to join their company in the TT system.
Account sharing: company administrator impact
As a company administrator, you can share accounts with users in other companies via the Accounts | Sharing tab in Setup. You do not have to use the Setup invitation process to share your firms accounts with users in other companies.
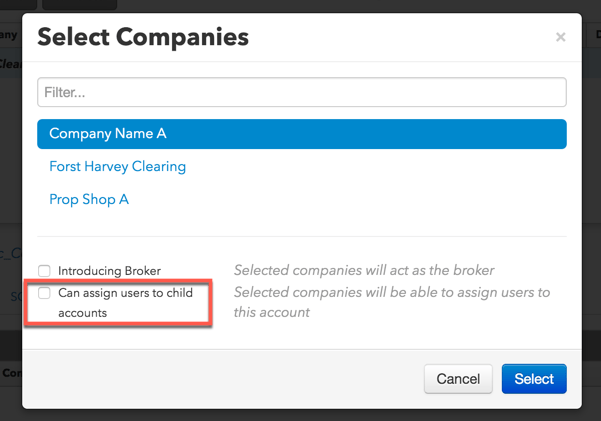
If the company that you will share the account with will be acting as an introducing broker, click Introducing Broker.
For example, if the account should appear to traders with the shared-with company’s name, while your company still maintains full ownership and risk controls, check the Introducing Broker option when sharing the account. This allows the introducing broker (shared-with) company to set additional limits and permissions for their own sub-accounts assigned to your shared parent account, while still being subject to limits set on the shared account.
To prevent the shared-with company from assigning users to the shared account, uncheck Can assign users to child accounts.
User Sharing
At the company level, sharing a user with another company allows the sharing company to create users and maintain ownership of the shared user’s day-to-day setup and user risk limits. The company with whom the user is shared creates, manages, and assigns the accounts to the shared user and maintains control of the risk settings on those accounts. For example, a buy-side firm can share users with an FCM, who can then assign accounts directly to those users, and can even control market data settings if needed. The buy-side is just responsible for creating users accounts.
User sharing rules
If you shared a user with another company or if another company’s user is shared with your company, consider the following restrictions on viewing or changing the user’s settings or profile:
- Shared users cannot be deleted by the companies they’re shared with, but they can be marked Inactive or set to Disable Trading. These settings only apply when the user tries to trade with the company that set the settings.
- A company can choose to pay for a client user’s login and trading activity fees by selecting “I agree to sponsor this user”. If the other company has agreed to pay these fees themselves, sponsoring is optional. Otherwise it is required.
- A shared user’s contact information can only be viewed by their own company.
- The sharing company can view all of their user’s accounts, including accounts assigned to the user by the shared-with company. However, the shared-with company can only view the accounts they’ve assigned to the user.
- A shared user’s product groups, limits, and credit can only be set by the sharing company.
User sharing: Client impact
As a client, the user sharing functionality allows you to trade with multiple brokers and trading firms while remaining a member of your own firm. You can continue to use the same Trade application workspaces, order book, audit trail, etc. Your user risk limits are configured by your own company, but the account risk limits are provided by and managed by the company that you are being “shared” with.
However, if you leave your firm or company in the TT system to become a member or employee of another company, your workspaces, accounts, and positions remain with the company you are leaving. In this case, you would accept a second invitation from the new company to become an employee or member of that company.
User sharing: Company administrator impact
As a company administrator, you can share your company users with another company by using the Company Relationships section on the Users | Profile tab in Setup.
Note: Unless they are leaving their firm to trade with yours, do not use the Setup invitation process to invite users in other companies to trade with your firm.
Shared account and user interactions
In order to provide their client with access to a market, companies may need to share a user with another company. In this case, the shared-with company will assign an account with the market’s credentials to the shared user, then share that account “back” to the shared user’s company.
However, a company may want to lock certain user fields (e.g., Operator ID) on the shared account or prevent companies from adding users to the related child accounts. As an administrator, there are two settings you can use when sharing an account with a user who has been shared with your company:
- Can assign users to child accounts — Prevents another company from adding users to the child accounts of a shared account. Uncheck this setting to prevent users from being assigned to the child accounts. By default, this setting is checked and users can be assigned. This option is available on the Accounts | Sharing tab.
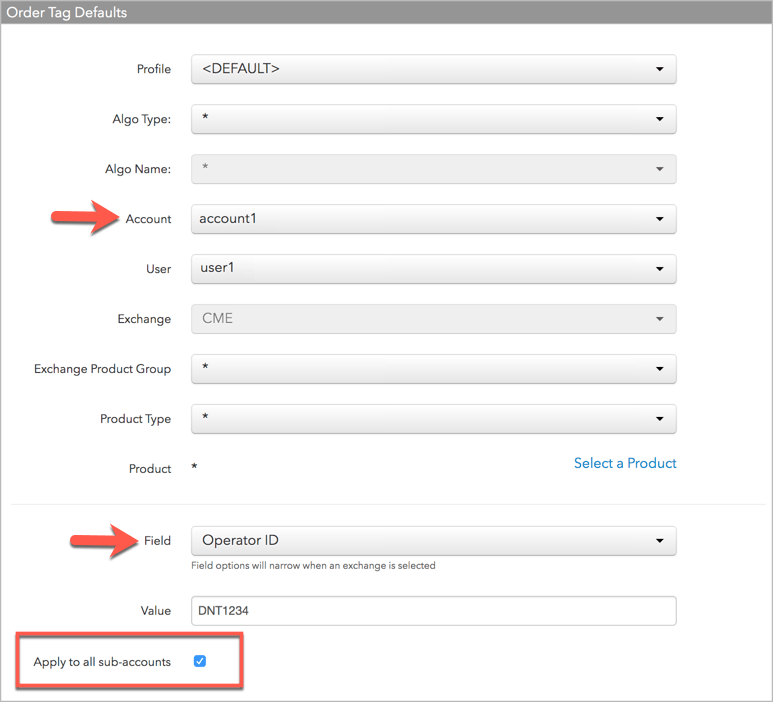
- Apply to sub-accounts — Can be applied to subscriber fields to lock these values on the child accounts of a shared parent account. This setting is available on the Order Tag Defaults tab in the left navigation pane for a selected profile.
Account sharing configuration
When the Can assign users to child accounts setting is unchecked on a shared account, consider the following:
- When acting as the introducing broker when sharing an account (Introducing Broker setting is checked), then Can assign users to child accounts cannot be unchecked. This setting is checked by default.
- The shared-with company cannot assign users to child accounts of the shared parent account. They also cannot move child accounts with assigned users to the shared account tree.
- Risk limits can be set for the child accounts that the shared-with company creates. However, the sharing company maintains full control over users and parent level account limits.
Example: Sharing an account with a shared user
In this example, a client firm (Client-A) shares one of their users (user1) with a broker (Broker-B) in order to provide “user1” with access to CME:
- Client-A shares “user1” with Broker-B, who is the owner of the CME market credentials.
- Broker-B assigns “account1” to “user1”.
Note: Using Order Tag Defaults, Broker-B sets the “Operator ID” field on account1 and checks the Apply to all sub-accounts checkbox to ensure that any child accounts created under “account1” will send the Broker-B Operator ID to CME.
- Broker-B shares “account1” with Client-A.
Note: When sharing the account, Broker-B unchecks the Can assign users to sub-accounts setting to ensure that only “user1” can trade with this account.
- Client-A creates child accounts “child1” and “child2” from “account1”. The child accounts inherit Client-A’s “user1” as well as the CME routing credentials from Broker-B. The Broker-B “Operator ID” is routed to the exchange on all orders submitted with the child accounts.
Managed and Sponsored Users
Trading firms (e.g., FCMs) can create and manage users that are not employees or members of their company, but in doing so they are required to agree to manage and sponsor that user. They are therefore responsible for all fees associated with the sponsored user’s log in and trading activity. If you do not wish to create, manage, and sponsor client users, then the client should instead create the users and share them with you.
As a company administrator, you would set up accounts and risk for sponsored users the same way you set up accounts and risk for users that are members or employees of your firm.
Managed User Rules
If you create a managed user, consider the following restrictions.
A Managed User cannot be:
-
Deleted without contacting TT if the Invitation Status equals “Active.” For any other status — sent, not sent, retired — the user may be deleted by the company administrator. Where required, any Managed User may be marked Inactive or set to Disable Trading.
-
Cloned
-
Shared to another company. For users that need to be shared with multiple firms, the client should create the user and share it with back to the company administrator.
Managed User Impact
As a user, being managed and sponsored by a company, allows you to trade with and have your risk managed by a trading firm or broker in the TT system without having to be a direct employee of that firm, and without having to set up your own user. You can only be sponsored by one firm at a time, but if you decide to move to another trading firm, you keep your Trade application workspaces, position history, and audit trail history. The sponsoring firm that you left retains their accounts, risk settings, and positions in those accounts.
Requesting to be sponsored by a firm is beneficial as a user if you have not previously joined your own or another company in the TT system, or if you have not set up a risk profile in TT and require another firm to provide you with the accounts and risk settings needed to trade TT.
The sponsoring company-user relationship is initiated by the Setup invitation process. As a company, you have to use the Setup invitation process to invite users to trade with your firm as sponsored users. This is the same process as inviting users of your own firm to join your company, so that they can trade in the production environment as members or employees of your firm.
As a user, you can accept an invitation to be sponsored if:
-
You currently are not in the TT system.
-
You are in the TT system (e.g., you are currently being sponsored by a company) but you want to leave that firm and trade with another firm.