


To add a new user:
Note: Only users with “Full Company Administrator” permissions can add users and send invitations. Users with “view-only” permissions do not have access to all administrative functionality on the Users | Profile page in the Setup application.
Creating a new user in your company
To create a new user in your company:
- Click Users in the left navigation pane and click the + New User button.
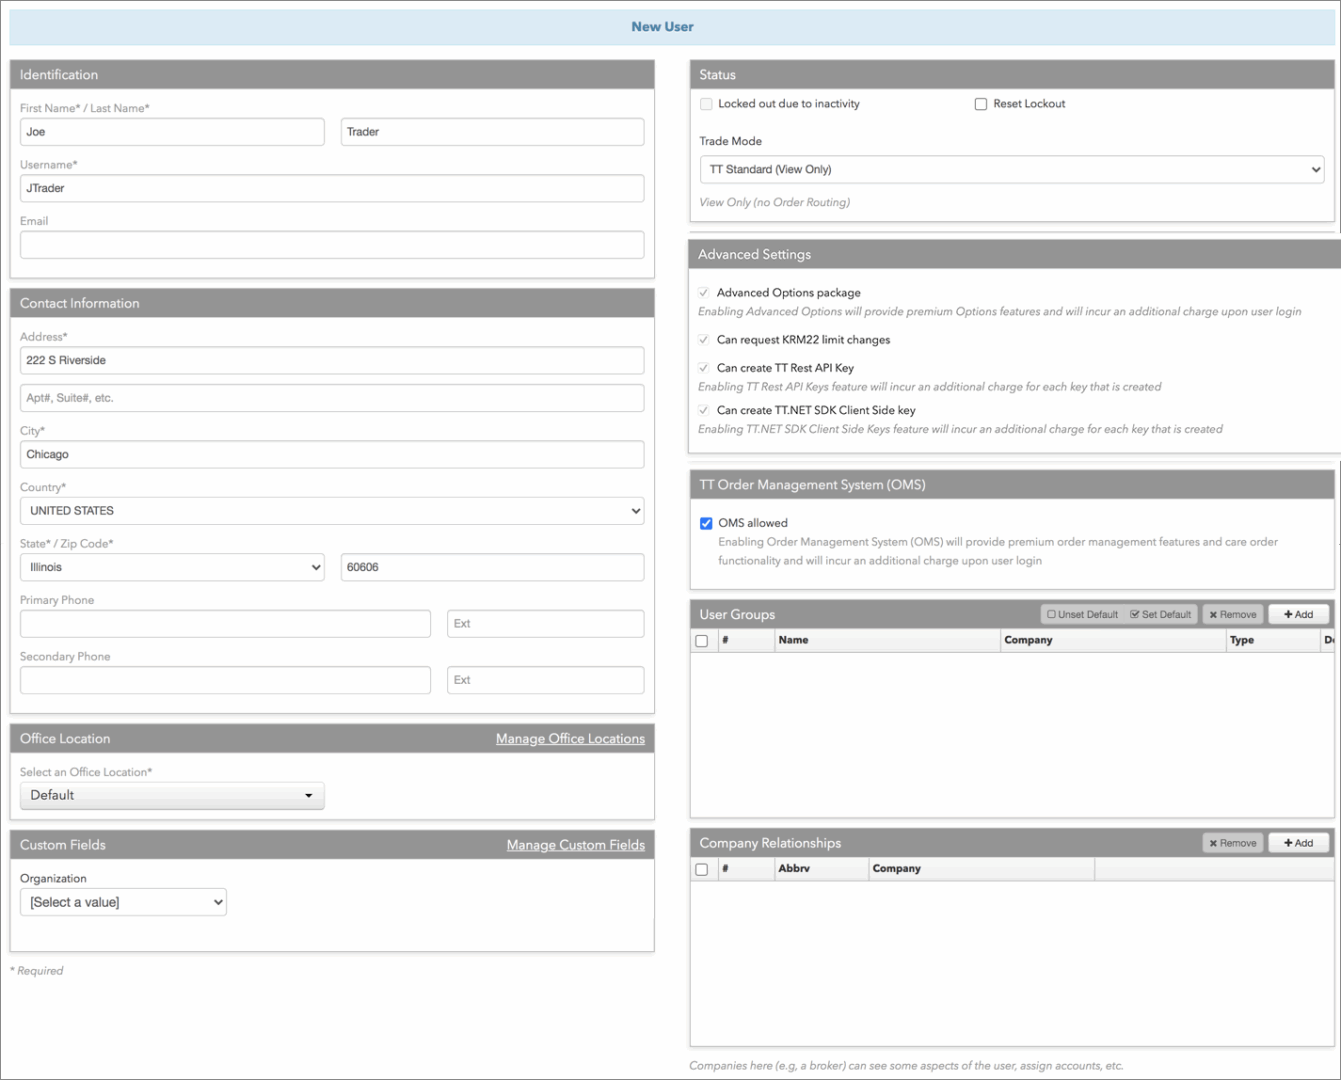
- On the New screen, enter user data in the Identification and Contact Information sections.
- Optionally, in the User Group section, click +Add to assign the user to an existing User Group
- In the Status section, select a Trade Mode.
The trade modes allow your company to control which professional Trade application features are accessible to a user on the TT platform. However, the trade mode settings do not take precedence over the account restriction settings or user account permissions. For example, if a user’s profile is set to “professional”, which allows access to Algo Dashboard, but the account assigned to the user is restricted from submitting algo orders, then the user would not be able to launch and submit orders via an algo.
Select one of the following:
Professional — Enables use of the following professional Trade app features:
- Autospreader®
- Autotrader™
- Rule Builder
- Algo Dashboard
- ADL
- Aggregator
- TTAPI SDK
Note: When you select the Professional trade mode for an active user, the user is billed at a higher rate for the month in which this mode is enabled.
- Basic — Enables order routing using the basic Trade app functionality without use of any professional features.
- View Only — Enables access to professional features, but prevents order routing using these features. This is the default setting for new users.
-
In the Advanced Settings Settings section, select the following as needed:
- Advanced Options package — Provides access to premium Options trading features.
Note: Enabling this setting will incur an additional charge upon user login.
- TT Backtesting Package — Enables use of the TT Backtesting package.
Note: Enabling TT Backtesting will incur an additional charge upon user login.
- Can create TT API REST Key — Indicates whether the user can create TT REST API keys for developing and running TT REST API applications.
Note: Allowing a user to create TT REST API keys can incur additional costs.
- Can create TT.NET SDK Client Side key — Indicates whether the user can create TT.NET SDK Client Side keys.
Note: Enabling the TT.NET SDK Client Side Keys feature will incur an additional charge for each key that is created.
- Advanced Options package — Provides access to premium Options trading features.
- In the Company Relationships section, click + Add to share the user with another company.
When a user is shared with another company, the other company has limited rights to the user’s configuration. The company that the user is shared with can only assign accounts that they own, set permissions for those accounts, and set any other user-level permissions that are specific to the shared company. However, they cannot change the user-level settings defined by the sharing company.
- In the Custom Fields section, click each field and select or enter a value as needed.
After you complete this section, the custom fields and values will be displayed on the user’s Custom Fields tab and not on their Profile tab.
Note: TT recommends assigning an Organization value to new users that are managed by your company, but are not employees of your company.
For more details about using the Organization field and other fields specifically for your company, refer to Custom Fields.
- Click Create.
The user appears as a “provisional user” (Status column displays Provisional) in the users grid at the top of screen.
After the user is added, you can send the user an invitation to trade in the production environment as part of your company, and set administrator and trade permission for the user.
In the New User dialog box that appears, select whether or not the user is a member or employee of your company, or is a user that is not an employee but will be managed by the administrator’s company.
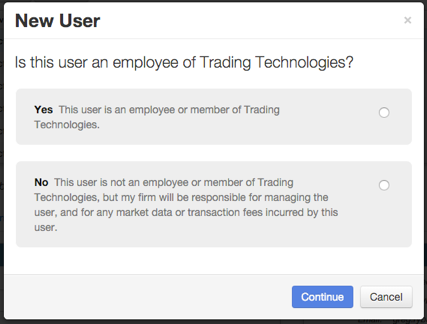
When the user being added is an employee or member of your firm, select Yes.
When the user being added is not an employee or member of your company, but you would like to invite and fully manage the user (including paying for the user’s market data and transaction charges), select No.
When the user being added is not a member of your company, but you do not want to manage and take responsibility for the user’s fees, click Cancel and contact your user’s administrator to ask for the user to be shared with your company. Contact TT support if you need assistance.
Sending an invitation
As a company administrator, use the Status section on the user profile screen to send an invitation via email or view the user’s invitation status.
Note: Do not send an invitation to a user that is already a member of their own company but wants to trade with your company. By doing so, the user may lose all of their current risk settings when accepting the invitation to your company. To have an employee or member of another company trade with your company, you can either share an account with the user or ask the user’s company to share the user with your company.
To send an invitation:
- In the Status section, click Send Invitation
Note: To send an invite, the Email field must be populated in the Identification section. This must be the email provided by the user. However, this email does not have to be the same address registered by the user as their TT account. The user will have to register a TT account before accepting your invitation.
Verify the Invitation Status in the Status section.
After sending the invitation, the user’s status of Sent appears in the Invitation Status column in the data grid and the Invitation Status field in the Status section.

If the status is one of the following, you will need to click Invitation Details to troubleshoot and resend the invitation:
- Sending failed — The invitation could not be sent from TT.
- Delivery failed — The invitation could not be delivered to the user’s email.
If needed, you can use the following buttons in the Status section after sending an invitation:
- Copy Link — This button appears when an invitation has been sent or re-sent. Use this button to copy the invitation acceptance link that was previously sent to a provisional user. You can then distribute the link to the user via an alternative method outside of the invitation process.
- Resend — Resends the same invitation link to a provisional user.
Note: User invites automatically expire after 60 days. If a user’s invite has expired, you can simply resend the invite to add the user.
- Revoke — Revokes the provisional user’s invitation. A message is sent to the user’s email address in the Identification section.
Invitation Details — Opens the Invitations tab and displays the invitation history for the user.
Note: On the left navigation pane, you can click the More | Invitations to view a status report of all invitations sent to users who were invited to join your company. Provisional user status is not displayed, but invitations sent to provisional users appear as “waiting” for that user.
For a list of invitation statuses, refer to Invitation Status Definitions.
Set user permissions
Use the Permissions tab to configure a user’s administrator, trade, and algo permissions.
In the Admin Permissions section, you can define additional administrative roles to delegate user setup and account setup to separate administrators. By unchecking the administrator restriction options in this section, you can set up administrators who are prohibited from enabling trading for accounts and/or users, and control whether administrators can disable the “Apply Limits” option for accounts and/or users. You can also set up TT Score administrators in this section.
In the Trade Permissions section, you can prevent the user from trading on TT, and set permissions for submitting RFQs. You can set these permissions for individual users or company administrators.
In the Algo Permissions section, you can set permissions for users to run their own algos, or approve order entry when algos are deployed. You can set these permissions for individual users or company administrators.

To configure user settings:
- Click Users in the left navigation pane and select a user in the Users Grid.
- On the user’s page, select the Settings tab
- Check one of the following settings in the Admin Permissions section:
- None — Allows a user to log in and see his own settings, but not see any other company settings.
- View Only Admin — Allows view-only rights for all company settings and allow use of the risk monitor to view orders for all their own company accounts and users. Order entry, deletion or modification is not allowed, and related settings in Order Permissions would not be honored.
- Internal Only Admin — Allows limited capabilities to manage only internal company users and not other clients.
- Admin — Allows full rights to change and configure company settings, add, delete, and edit users, user groups, accounts, connections, and FIX Sessions, and to manage a subset of settings for users that are shared with the company unless restricted by the company administrator. Additionally, administrators can be allowed to use the Monitor application to view orders, delete orders, and update positions for all company accounts and users, or they can be set up with permissions to manage individual accounts.
When the Admin checkbox is checked, a list of administrator restrictions is enabled with all checkboxes checked. You can uncheck these options to restrict specific administrator permissions.
Note: Administrators with an option unchecked cannot enable that option for other users, and when cloning users or accounts, the applicable user/account settings will default to checked regardless of the original user/account settings. For example, if an administrator has “Enable/Disable trading for users” unchecked, then all users the administrator clones will have trading disabled, even if the original cloned user has trading enabled.To restrict administrator permissions, uncheck the following settings as needed:
- Enable/disable trading for users — Restricts an administrator from allowing trading for users in your company. When the “Enable/disable trading for users” option is unchecked, the administrator cannot check or uncheck the Users | Settings | Disable Trading checkbox.
- Enable/disable trading for accounts — Restricts an administrator from allowing trading for accounts in your company. When the “Enable/disable trading for accounts” option is unchecked, the administrator cannot check or uncheck the Accounts | Settings | Disable trading (this account, only) checkbox.
- Enable/disable trading for sub-accounts — Restricts an administrator from allowing trading for sub-accounts in your company. When the “Enable/disable trading for sub-accounts” option is unchecked, the administrator cannot check or uncheck the Accounts | Settings | Disable trading (sub-accounts) checkbox.
- Enable/disable Apply Limits for accounts — Restricts an administrator from disabling product risk limits for accounts in your company. When the “Enable/disable Apply Limits for accounts” option is unchecked, the administrator cannot check or uncheck the Accounts | Limits | Apply Limits checkbox.
- Can Add and Edit Account Limits — Restricts an administrator from adding or modifying account limits, effectively preventing the administrative user from creating or editing any accounts with limits. Also, an administrator with this setting unchecked cannot check this setting for other users.
Note: When unchecked, this setting also prevents administrators from unchecking the Accounts | Limits | Apply Limits option to allow accounts to trade without limits.
- Can Modify User Settings and Information — Restricts the administrator from adding or modifying user settings. Also, an administrator with this setting unchecked cannot check this setting for other users.
- Manage Connections — Restricts the administrator from creating or editing connections. When unchecked, an administrator cannot create or edit connections and cannot check this setting for other users.
- Configure the following in the Trade Permissions section:
- Disable Trading — Prevents the user from adding or modifying any orders, for any product, using any account.
- Request for Quote (RFQ) — Allows users to submit an RFQ.
- Configure the following in the Algo Permissions section:
- Requires Permission to Run Own Algos — controls whether users can deploy algos without requiring approval. When checked, the user cannot run an algo that is unapproved, and must submit algos for approval via the Deploy option in ADL. When unchecked and algo trading is allowed on the account, users can run and pause all versions of their own algos with unlimited concurrent instances without need of approval. Note: For new users, this setting is checked by default in the Live environment and unchecked in all other environments.
- Algo Approver — Allows users to view names of all algos that have been submitted for approval and mark each algo as “approved” or “unapproved” as needed. Company administrators have the Algo Approver option enabled (checked) by default.
- Configure the following in the TT SCORE Permissions section:
- TT SCORE Admin — Allows an administrator to run TT Score for all accounts in their company. Check to enable this option, which can only be checked if TT SCORE Account Admin is unchecked. This setting cannot be modified until Customer Success has activated TT Score for your company.
- TT SCORE Account Admin — Allows an administrator to run TT Score for their own accounts only. Check to enable this option, which can only be checked if TT SCORE Admin is unchecked. This setting cannot be modified until Customer Success has activated TT Score for your company.
- TT SCORE User — Allows an individual user to run TT Score for their own accounts. Check to enable this option.
- TT SCORE Admin — Allows an administrator to run TT Score for all accounts in their company. Check to enable this option, which can only be checked if TT SCORE Account Admin is unchecked. This setting cannot be modified until Customer Success has activated TT Score for your company.
- Configure the following in the KRM22 Permissions section:
KRM22 Limits Admin — Allows an administrator to configure risk limits using the KRM22 Limits Manager. For more information on KRM22, refer to KRM22 Limits Overview section.
- Click Save Changes.