Company
Managing custom fields
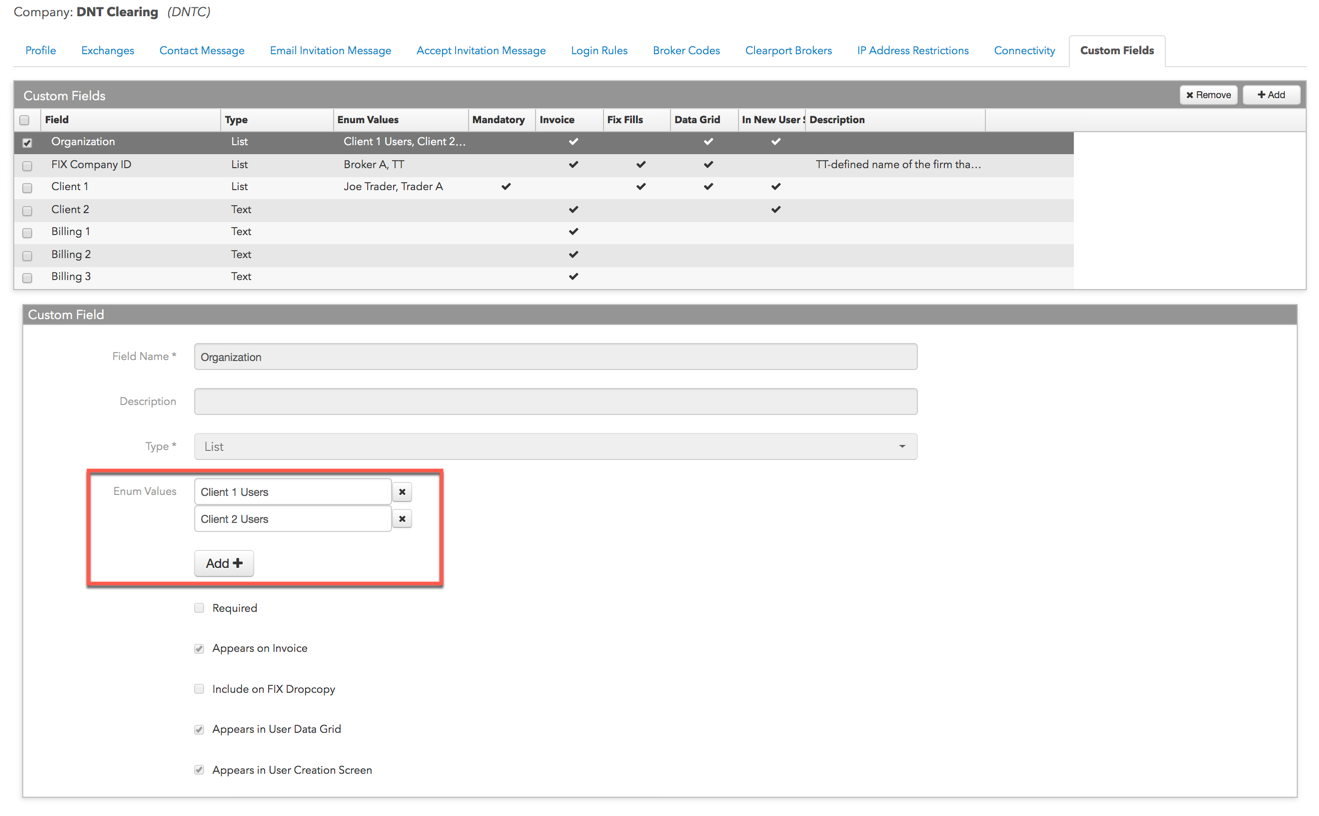
As an administrator, use the Custom Fields tab to add, modify, or remove custom fields for users employed or managed by your company.
To add a custom field:
- Click Company Settings | Settings in the left navigation pane.
- Click the Custom Fields tab and click + Add.

The Custom Field section appears.

- In Field Name, enter a user-defined name.
Optionally, in the Description field, enter a brief description or purpose for the field being added.
- In the Type field, select one of the following field types:
- Text — Creates a text field.
- List — Creates a drop-down list item selector field. If selected, click the Add + button to add one or more "Enum" values to the list.
- Boolean — Creates a checkbox field.
- Date — Creates a date selector field.
- Check one or more of the following options as needed:
- Required — Defines the field as being required for users.
- Appears on Invoice — Sets the field to display on TT billing invoices for use by TT administrators.
- Include on FIX Dropcopy — Sets the field to be included on FIX Drop Copy messages as tag 18221.
Note: The Include on Fix Dropcopy functionality will be supported in a future release.
- Appears in User Data Grid — Sets the field to display for each user in the data grid on the Users tab.
- Appears in User Creation Screen — Sets the field and settings to appear on the "New User" screen when adding a user to your company.
- Click Save Changes.
Modifying a custom field
On the Custom Fields tab, you can modify the fields provided by TT as well as your own custom fields.
- Click Company Settings | Settings in the left navigation pane and select the Custom Fields tab.
- To modify the Organization or FIX Company ID field, select it in the grid and click ADD + in the Custom Fields section to add a list value (Enum Value), or click the X next to a value to remove it.

Note: You can add one of more list values to these fields, but all other settings cannot be modified.
- Modify all other custom field settings as needed in the Custom Field section.
To remove a list field, click the X next to an "Enum Value" to remove it from the list selector on the Users | Custom Fields tab.
Note: Once a field type is set and the field is assigned to a user, the Type value cannot be modified.
- Click Save Changes.
Removing a custom field
Caution: The custom field and all of its associated data will be permanently removed from the TT system.
- Click Company Settings | Settings | Custom Fields using the left navigation pane.
- Select a field in the Custom Fields data grid and click Remove.