MiFID II Guide for the TT Platform
MiFID Adding Order Tag Defaults
Using the Setup application, you can create and add Order Tag Default profiles for users in your company.
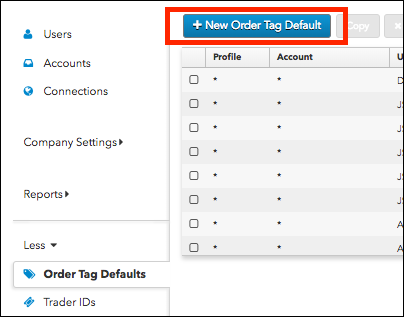
To add order tag defaults:
- Click More | Order Tag Defaults tab in the left navigation panel.
- Click the + New Order Tag Default button at the top of the screen.
Configure the settings on the "new" Order Tag Defaults screen.
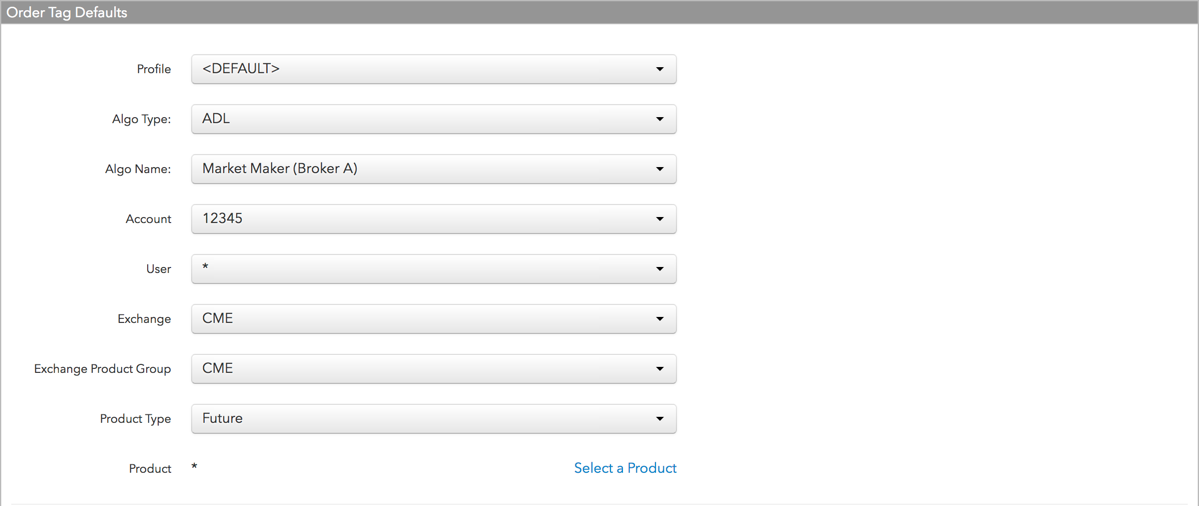

The following key fields will be used for selecting an Order Tag Default profile at order entry.
Note: For each key field, the default setting is "*", which applies the Field and Value settings to all available options for that field.
- Profile — Select a profile name or click Add New to a add a profile name.
- Algo Type — Select a TT algo, or select "Third-party algo" to set the Order Tag Defaults profile for a custom algo or bank algo.
- Account — Select an account. All accounts available in the company are displayed.
- User — Select a user. All users who accepted an "invitation" to your company are listed. Users shared with your company are not listed.
- Exchange — Select an exchange.
- Exchange Product Group — The default setting is "*" for all product groups and cannot be changed.
- Product Type — Select a product type.
- User — Select a user. All users who accepted an "invitation" to your company are listed.
- Exchange Product Group — Select a product group or "*" for all product groups available at the selected exchange.
- Product — Select a product or "*" for all products available at the selected exchange.
- Account — Select an account. All accounts available in the company are displayed.
- Locked — Prevents users from changing the Order Tag Defaults values when submitting orders. Check the checkbox to lock the values, or uncheck to allow users to change them at order entry. By default, the setting is unchecked and users are allowed to change these values.
The following fields will be applied to an order based on the key fields above.
- Field — Select which field to add to the profile. Field selections are displayed based on the Exchange selected. MiFID II tags can be selected in this field.
- Value — Enter a value for the selected field (e.g., a Short Code for the Execution Decision ID field as required by the selected exchange).
- Apply to all sub-accounts — Allows a company sharing an account with another company to lock the value in an account field. This ensures that any sub-accounts added to the shared parent account cannot have a different value in this field and that the locked value is sent to the exchange. Check the checkbox next to each field to lock its value as needed. When checked, the value cannot be changed on any sub-accounts added by your company or a shared company.
Click Save.
The Order Tag Defaults are added as a profile in the data grid.
Tip: To add multiple profiles that reuse most of the same settings, change one or more of the settings for the saved profile then click Save and Add New. Repeat for each additional profile as needed.
Editing Order Tag Defaults
To edit order tag defaults:
- Click More | Order Tag Defaults and select a record in the data grid.
- In the Order Tage Defaults panel, modify the settings and click Save Changes.