ICE_L
Configuring user access to ICE_L
ICE offers different types of memberships based on the market you wish to trade. For all markets, the membership process includes meeting certain eligibility requirements and completing all required applications and agreements.
The ICE_L "exchange" is the market data feed and matching engine in Basildon UK for the IFEU Financials product group that was migrated to ICE from the Liffe platform.
To configure user access to ICE:
- Click the Users | Exchanges tab for a user selected in the data grid.
- Click the exchange list drop down arrow, and scroll to and select an exchange.
- Click the Subscriber Market Data, SDK Client Market Data, FIX and SDK Market Data and Order Routing tabs to configure the user for the selected exchange:
- Use the Subscriber Market Data tab to allow or deny user access to all subscriber market data or market data per product group.
- Use the SDK Client Market Data tab to allow or deny user access to market data using TT .NET SDK Client Side trading applications.
- Use the FIX and SDK Market Data tab to allow or deny user access to market data using FIX, TT .NET SDK Server Side, and TT Core SDK trading applications.
- Use the Order Routing tab to configure exchange credentials for user identification.
Configure the following Order Routing settings:
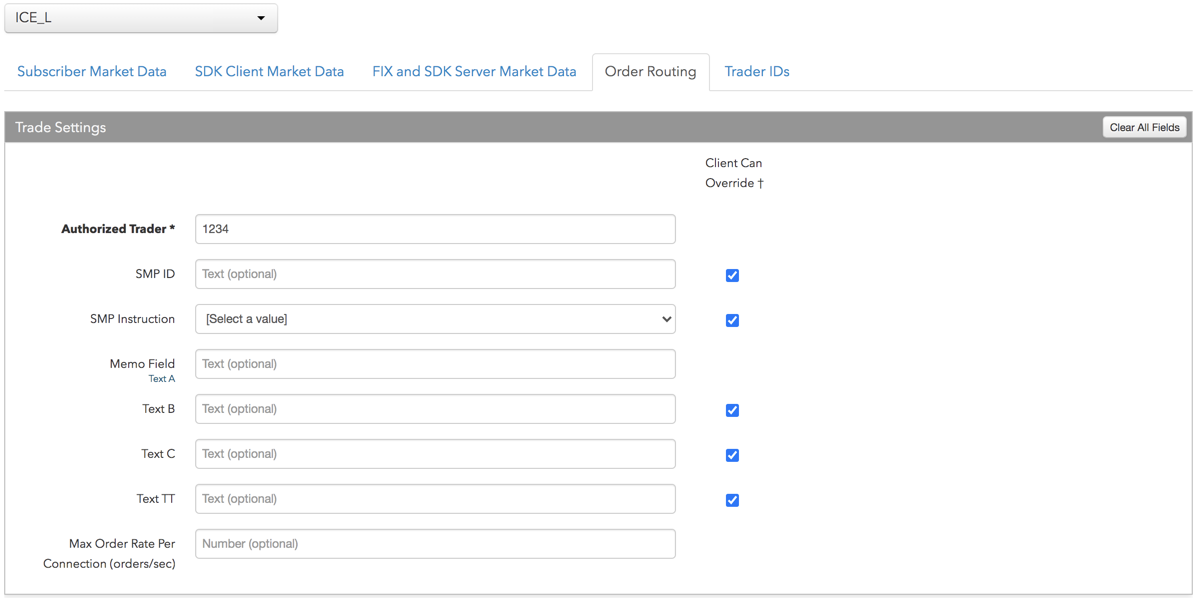
- Authorized Trader — Enter a user-defined ID that ICE uses to identify the user on all order actions. This ID must be registered at the exchange and is sent in Tag 116 (right). This is a required field.
- SMP ID — Sets a Self Match Prevention Identifier (SMP ID) for the account. Enter a user-defined, exchange-registered "STPF ID" in this field. SMP is optional and allows a firm to prevent the matching of orders for accounts with common ownership if both the buy and sell orders contain the same "SMP ID" field value. Sent to the exchange as Tag 9821.
- SMP Instruction — Sets which order is canceled (resting, aggressing, or both) if self-match prevention occurs. This setting is optional. If no SMP Instruction is specified for an SMP ID, the resting order is canceled. If an instruction is set, the value is sent to the exchange in Tag 9822. To assign a self-match prevention instruction to an order action, select one of the following:
- Cancel Resting order — Cancels the resting order and sends the aggressing matching order to the exchange. 9822=R.
- Cancel Taker order — Leaves the resting order in the market and cancels the aggressing matching order. 9822=T
- Cancel Both orders — Cancels the resting and aggressing orders. 9822=B
- Memo Field (Text A) — An optional, user-defined text value that is routed to the exchange for clearing and back office purposes. This field maps to FIX Tag 9121. Alpha-numeric and special characters are allowed.
- Text B — An optional, user-defined text value that remains on submitted orders in the TT system, but is not sent to the exchange. Alpha-numeric and special characters are allowed.
- Text C — An optional, user-defined text value that remains on submitted orders in the TT system, but is not sent to the exchange. Alpha-numeric and special characters are allowed.
- Text TT — An optional, user-defined text value that remains on submitted orders in the TT system, but is not sent to the exchange. Alpha-numeric and special characters are allowed.
- Max Order Rate Enabled — Enables order throttling for connections assigned to the user. The maximum order rate is defined and enforced by the exchange. Messages exceeding the maximum rate are rejected by the exchange.
- Max Order Rate — Sets the maximum number of orders per second that a user can enter per connection. This limit cannot exceed the exchange-defined order rate maximum.
- Client Can Override — Determines if a user can override the value in this field when submitting orders from trading applications or APIs. Check the check box to unlock the field and allow a user to override the value. When unchecked, the field is locked and the user cannot change it.
-
Click the Subscriber Market Data tab to allow or deny access to IFEU Financials available at the exchange.
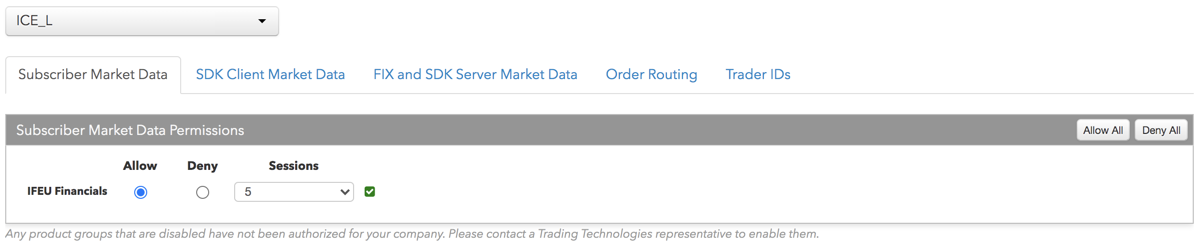
If Allow is enabled, click Sessions to set how many simultaneous market data sessions the user can have active using different IP Addresses/Applications. Selecting 0 - Delay Only indicates that the product group is denied in all environments except the delayed environment, which does not have access to real-time market data.
Note: Any product groups that are disabled have not been authorized for your company. Please contact a Trading Technologies representative to enable them.
For exchanges that require market data agreements, the following indicators are displayed next to the "Sessions" field:
 — Indicates the market data agreement has been approved.
 — Indicates the market data agreement is outstanding or pending approval.
Tip: Click a market data indicator to open the Agreements tab.
-
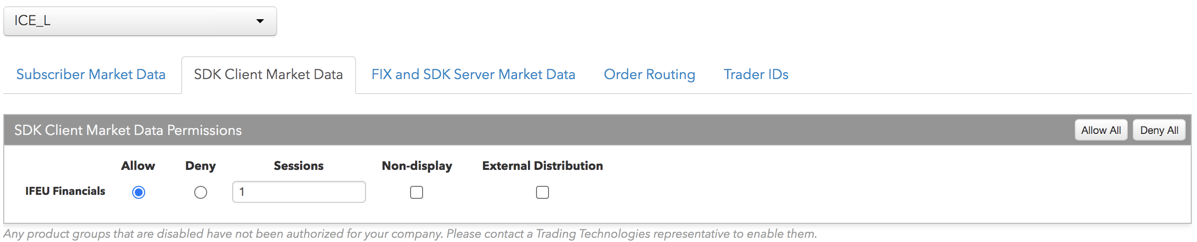
Click the SDK Client Market Data tab to allow or deny access to the market data groups available at the
exchange for TT .NET SDK Client Side trading applications.
If you click Allow to enable a market data group, configure the Sessions field as follows:
- If using only TT .NET SDK Client Side application keys, then set Sessions equal to the number of application keys you plan to run concurrently.
- If using only TT .NET SDK Client Side - Non-display application keys, then set Sessions equal to "0" and check the Non-display checkbox, which indicates the market data is for non-display purposes (e.g., black-box algorithm, automated program for calculating P/L, etc.) as defined by the exchange.
- If using both TT .NET SDK Client Side and TT .NET SDK Client Side - Non-display application keys, then set Sessions equal to the number of TT .NET SDK Client Side application keys that you plan to run concurrently and check the Non-display checkbox.
If you are distributing the market data externally (e.g., to users outside of your company), check the External Distribution checkbox.
Note: Any product groups that are disabled have not been authorized for your company. Please contact a Trading Technologies representative to enable them.
-
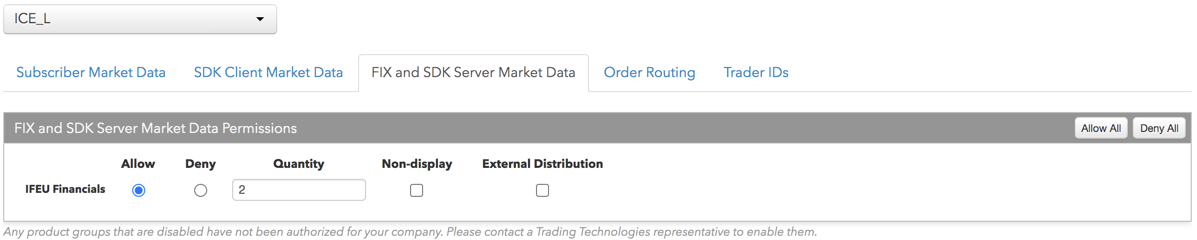
Click the FIX and SDK Server Market Data tab to allow or deny access to the market data groups available at the
exchange for TT FIX, TT .NET SDK Server Side, and TT Core SDK trading applications.
If you click Allow to enable a market data group, click Quantity to set the number of users viewing the market data behind the FIX feed or the number of TT .NET SDK Server Side or TT Core SDK applications using the data concurrently.
If the FIX feed or SDK server-side trading application is for non-display purposes (e.g., black-box algorithm, program for calculating P/L, etc.) as defined by the exchange, click Allow to enable the market data group, set the Quantity, and check Non-display.
If you are distributing the market data externally (e.g., to users outside of your company), check the External Distribution checkbox.
Note: Any product groups that are disabled have not been authorized for your company. Please contact a Trading Technologies representative to enable them.
- Click the Trader IDs and click an entry in the Trader ID column of the table to add a user-defined ID.
Trader IDs are added by populating the Routing Trader Override field on the More | Trader IDs tab in the left navigation panel. You can also select Add New from the trader ID selector when clicking an entry in the table. The Routing Trader Override (also called the "FIX ID" by ICE) is required if it is different than the "Default Routing Trader" on the connection.
Note: The Routing Trader ID (FIX ID) and Password are required for a trader ID and if the routing trader ID and password are not configured on the ICE_L connection.
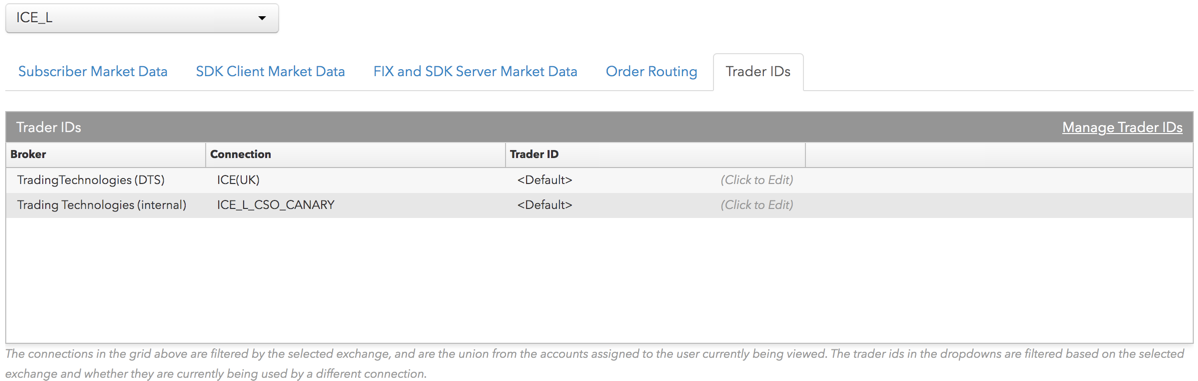
Trader IDs that are user-defined must be configured on the Trader Ids tab. This value will override the exchange-provided Routing Trader ID in Tag 116 (left) on all orders sent to the exchange. Trader IDs are created by an admin via the ICE administration portal. In Setup, a Trader Id can only be assigned to one connection.
- Click Save Changes.