LME NTP
Adding an LME NTP account
To add an LME NTP account:
- Click Accounts in the left navigation pane.
Click +New Account at the top of the Accounts screen.
The Account Information section is displayed.
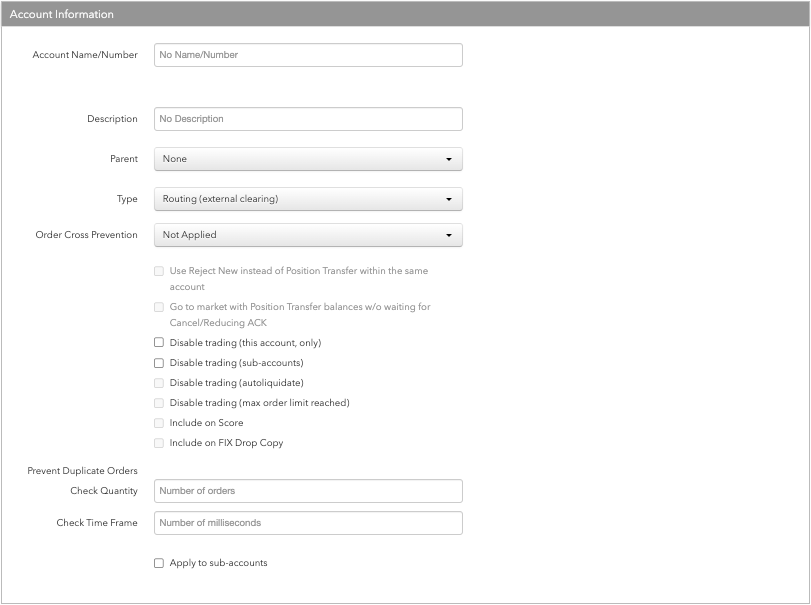

- If this is a sub-account, select a "parent" account in the Parent field.
- Click the Type field and select an account type.
Use this field to define the routing behavior for the account and set up its account hierarchy for tiered risk. All order routing is based on the user account. Select one of the following:
-
Routing (external clearing): Defines the parent account as a clearing account sent to the exchange on all orders. If assigned to a user, the account appears in the user's list of routable accounts. When selected by a user, the account is used to route orders and identify the account to the exchange (e.g, FIX Tag 1). If configuring this account as an omnibus account, select this option. If an internal sub-account is assigned to a parent account, the sub-account inherits the exchange connectivity of the parent account.
-
Routing (internal sub-account): Defines the account as a sub-account that is not routed to the exchange. This allows you to assign the user to an internal account for routing and risk purposes, even though a parent account will be sent to the exchange as the actual clearing or omnibus account.
Tip: Sub-accounts set as "Routing (internal sub-account)" can be selected by client trading applications for submitting orders, but only their parent account's clearing account is routed to the exchange.
-
Non-Routing: Not sent to the exchange. Recorded internally and can be used for back-office purposes, or as a parent risk account that allows you to group a set of sub-accounts together and set risk for the non-routing parent.
Tip: Accounts set as "Non-Routing" are not selectable by client trading applications.
-
Audit Trail Only: Not sent to the exchange. Use this account type for the TT FIX Inbound Drop Copy service, which allows third parties to import their data sources into TT. When selected, the "Order Cross Prevention" option is disabled for this account.
-
Error Routing: An account that can be used to route order reject messages created by FIX Order Router or FIX Inbound Drop Copy to specific Drop Copy sessions. Error accounts can be assigned to users and to FIX Order Routing and Inbound FIX Drop Copy sessions. An error account is not routed to the exchange and is not part of account hierarchies.
-
- To prevent order crossing using this account or any of its sub-accounts, click the
Order Cross Prevention field and select an order crossing rule. The TT Trade
application performs the following order actions based on which rule is selected:
- Not Applied — No order cross prevention rule is applied to the account.
- Reject New — Reject a new order that could potentially fill resting orders in the same account or account tree. Applies to only Limit orders and native Iceberg orders.
- Cancel Resting (wait for ACK) — Send a cancel request to the exchange for the resting order. When the exchange acknowledges the request and cancels the order, submit the new order. Applies to only Limit orders and native Iceberg orders.
Position Transfer — When a match is detected, the resting order is canceled or the working order quantity is reduced by the size of the aggressive order. A fill is created by TT and sent to each account. If the aggressive order was larger than the resting order, then the remainder of it will be sent to market. For a description of how Position Transfer works, refer to Position Transfer.
Position Transfer (if resting order is best bid/offer) — This rule works the same as Position Transfer except that the internal matching occurs only if an order has the potential to fill a resting order at the current best bid/ask price.
Note: When using this rule, the resting order may get matched and filled at the exchange while the aggressive order is in flight.
- Optionally, check one of the following options:
- Use Reject New instead of Position Transfer within the same account — When enabled, this setting prevents the use of position transfer within the same account and uses "Reject New" for order cross prevention. This setting is active when "Position Transfer" is selected for the account, otherwise, it is grayed-out.
- Go to market with Position Transfer balances w/o waiting for Cancel/Reducing ACK — When enabled, Position Transfer does the following if the aggressive order quantity is larger than the resting order quantity:
- Reduces the aggressive order quantity by the amount of the resting order
- Submits a request to the exchange to cancel the resting order, followed immediately by an order for the remaining quantity without waiting for acknowledgement that the resting order was canceled or reduced.
For example, if a 2-lot Sell order is resting when a 10-lot Buy order is entered that matches, Position Transfer immediately sends a cancel request to the exchange for the Sell order, followed by an 8-lot Buy order. Position Transfer then waits for the exchange to acknowledge that the 2-lot Sell order was canceled successfully. After receiving acknowledgement, the 2-lot fills are created internally and transferred to each trader's account.
Using this option, you can submit part of the order to the market sooner while the remainder of the order waits to be transferred. You can also reduce the risk of the entire aggressive order being rejected while waiting for the position transfer to complete.
Note: With this option, there's a risk that the crossing orders may match at the exchange if the two traders are using separate exchange connections on two different order routing servers.
- Disable trading (this account only) — Disables trading for this account. This checkbox is checked by default.
- Disable trading (sub-accounts) — Disables trading for all child accounts of this parent account.
- Disable trading (autoliquidate) — Checked automatically after auto-liquidate is triggered on an account. Increase the credit limit and uncheck this option to restore trading to a liquidated account. This setting can only be checked by the Setup application when an account is liquidated (i.e., you cannot manually check this setting).
- Disable trading (max order limit reached) — trading will be disabled after the specified maximum order limit, specified in connections, has been breached.
- Include on Score — This account will be utilized for TT score Surveillance models.
- Include on FIX Drop Copy — The trades from this account will be included on the FIX drop copies generated.
- Optionally, configure the Prevent Duplicate Orders settings:
- Check Quantity — Sets the number of duplicate orders to allow within the configured time frame.
- Check Time Frame — Sets the time frame in milliseconds and enables the duplicate order check for the account. Enter a value from 1-999999999. When the number of orders for the same instrument and price set in the Check Quantity field occurs within the configured time frame, the duplicate orders are rejected. When Check Time Frame is blank, no duplicate order check is applied to the account.
- Apply to sub-accounts — Copies the "Prevent Duplicate Orders" settings from the parent account to their child accounts. This ensures that any sub-accounts added to the shared parent account cannot have a different\missing value in this field . When checked, the value cannot be changed on any sub-accounts added by your company or a shared company.
- In the Order Management System (OMS) Settings section, configure the following:
- Lock fill notifications on new staged orders — Controls how fills are reported back to the care order originator. When this setting is checked, new care orders are automatically locked when they are claimed. Fills for locked orders will have to be manually allocated and released. When unchecked, fills and fills prices are immediately released back to the customer using the average prices calculated by TT. This setting supports the Lock and Release functionality in TT OMS.
- Only combine orders with the same price — Restricts how care orders are bulked. When this setting is checked, only care orders with the same price can be added as part of a bulk order. When unchecked, care orders at different prices can be bulked. Bulking requires that all care orders have the same product and Buy/Sell side. This setting supports the Bulking functionality in TT OMS.
- Only combine orders with the same account — Restricts how care orders are bulked. When this setting is checked, only care orders with the same account can be added as part of a bulk order. When unchecked, care orders in different accounts can be bulked. Bulking requires that all care orders have the same product and Buy/Sell side. Supports the Bulking functionality in TT OMS.
- Only combine orders with the same customer — Restricts how care orders are bulked. When this setting is checked, only care orders with the same order profile can be added as part of a bulk order. When unchecked, care orders with different customer order profiles can be bulked. Bulking requires that all care orders have the same product and Buy/Sell side. Supports the Bulking functionality in TT OMS.
- Click Create.
The new account appears in the Accounts list in the data grid. Sub-accounts appear as nested under their parent account.
In the Account Name/Number field when creating an account for LME, enter the up to 40-character exchange-defined account name, which is required for order routing. The user's TT routing account is sent to the exchange as the clearing account on each order action in Tag 58.
Configuring LME NTP properties
Note: Executing Firm (Party Role 452 with PartyID 448=1), Clearing Firm (Party Role 452 with PartyID 448=4) and Entering Trader (Party Role 452 with PartyID 448=36) are not supported for LME submissions but derived by LMEselect10 on receipt and returned in the Execution Reports.
- Click Accounts in the left navigation pane and select an account in the data grid.
- Click the Exchanges tab for the selected account.
- Click the Select an Exchange selector to find and select an exchange.
- Configure the settings in the Exchange Properties section.
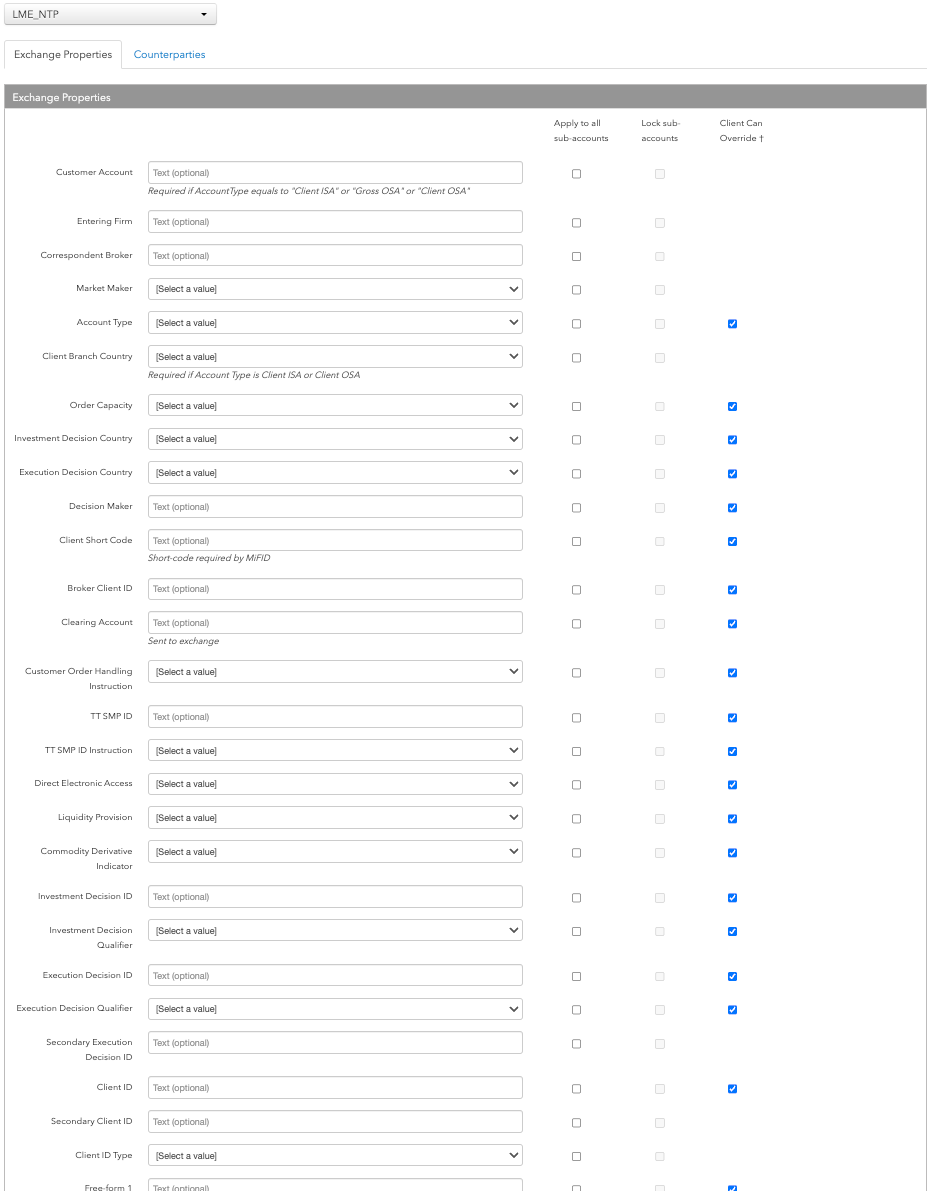
- Customer Account — Identification of the Client Account Code where the Account Type (581) = 1, 8 or 101. Mandatory for Client Orders. Sent to the exchange as Tag 448 with 452 Party Role = 24-CustomerAccount.
- Entering Firm — (Optional) Identifier of the entering firm. A 3-character broker code (member mnemonic). Sent to the exchange as Tag 448 with 452 Party Role = 7-EnteringFirm.
- Correspondent Broker — (Optional) A 3-character broker code (member mnemonic). Sent to the exchange as Tag 448 with 452 Party Role = 26-Correspondent Broker.
- Market Maker — (Optional) This should be set to Y if the trader qualifies for a Market Maker initiative. Sent to the exchange as Tag 448 with 452 Party Role = 66-MarketMaker.
- Y
- N
- Account Type — Sets the account type. Sent to the exchange as Tag 581.
This is a required field. Select one of the following:
- Client ISA: Individual segregated client account
- House: House account
- Gross OSA: Joint back office account (JBO)
- Client OSA: Omnibus client account
- Client Branch Country — ISO Country Code to identify the branch that received the client order or made an investment decision for a client. Select a country (2-character code) from the drop-down list. This setting is required if the Account Type is either "Client ISA" or "Client OSA". Sent to the exchange as Tag 448 with 452 Party Role = 304-ClientBranchCountry. Sent to the exchange in Tag 528.
- Order Capacity
- Agency
- Principal
- Riskless Principal
- Investment Decision Country — ISO Country Code of the branch responsible for the person making the investment decision. Select a country (2-character code) from the drop-down list. Sent to the exchange as Tag 448 with 452 Party Role = 302-InvestmentDecisionCountry.
- Execution Decision Country — ISO Country Code of the branch responsible for the person making the execution decision. Select a country (2-character code ) from the drop-down list. Sent to the exchange as Tag 448 with 452 Party Role = 303-ExecutionDecisionCountry.
- Decision Maker — Enter the short code of the third-party investment decision maker if applicable. This setting is required if the Account Type is either "Client ISA" or "Client OSA". Sent to the exchange as Tag 448 with 452 PartyRole = 122.
- Client Short Code — Used to submit a Client Short Code or an AGGR/PNAL Order Attribute type. Values of 1, 2 and 3 are not valid for PartyID, but can be submitted for Order Attribute Type mapping.
- No Client: Indicated by entering the value 0
- AGGR: Indicated by entering the value 1
- PNAL: Indicated by entering the value 2
- Client Short Code: any numerical value of 4 or greater.
Note: 3 is not a valid value.
- Broker Client ID — (Mandatory) Identifier of the entity in a risk group. Sent to the exchange as Tag 448 with 452 Party Role = 81-BrokerClientID. In PTRM, Broker Client ID is configured as an End Client within a Risk Group.
- Clearing Account — Free form text sent to the exchange as Tag 58. This cannot be overridden by clients and will not override any other field. LME does not support a field called Clearing Account. By default, the user's TT routing account is sent in the Tag 1 field.
- Customer Order Handling Instruction — (Optional) It is sent to the exchange in Tag 1031, which identifies the execution method and source of derivatives trades.
- Desk
- Electronic ( Default )
- Vendor-Provided Platform, billed by Executing Broker
- Sponsored Access via Exchange API or FIX, provided by Executing Broker
- Premium algorithmic trading Provider, billed by Executing Broker
- Other, Including Other Provided Screen
- TT SMP ID — A user-defined, alphanumeric identifier used to tag orders so the TT system can match potential crossed trades.
- TT SMP ID Instruction — Sets the TT SMP behavior and determines which order is canceled (resting or aggressing) if self-match prevention occurs.
- Direct Electronic Access — Identifies the origin of the trader. Sent to the exchange as OrderOrigination Tag 1724. Order received from a direct access or sponsored access trader should have a value set to “Yes.” A value of “No” indicates DEA=False.
- Liquidity Provision — When set to “Yes” the value 2 is sent to the exchange in OrderAttributeType Tag 2594.
- Commodity Derivative Indicator — Indication of whether the order is for hedging purposes to reduce risk. When set to “Yes” (meaning “True”) the value 3 is sent to the exchange in OrderAttributeType Tag 2594.
- Investment Decision ID — Short code to identify the individual who is responsible for the investment decision. Sent to the exchange as Tag 448 with 452 PartyRole = 300-InvestmentDecisionWithinFirm.
- Investment Decision Qualifier — Determines if the trading decision was made manually by a user or automatically by an automated trading application using this account. This is an optional field. Select one of the following:
- Manual: Indicates the trading decision was made by a person.
- Automatic: Indicates the trading decision was made by an automated trading application.
Note: As a result of Brexit, you may be required to populate this field. For additional information on this requirement, contact your LME representative.
Note: Not supported by LME.
- Execution Decision ID — Short code to identify the execution decision maker with the firm. This is required for New Order Single and will be returned in Execution Reports. Sent to the exchange as Tag 448 with 452 PartyRole = 301-ExecutionDecisionWithinFirm.
- Execution Decision Qualifier — Determines if the user or firm sent the order manually or automatically using an automated trading application with this account. This is an optional field. Select one of the following:
- Manual: Indicates the order was sent manually.
- Automatic: Indicates the order was sent automatically.
- Secondary Execution Decision ID — Secondary user or firm associated with the order. This field can be used for trading on behalf of clients and used for internal reporting purposes. Enter a registered ID/Short Code.
- Client ID — Enter a user-defined client ID up to 40 characters. Source of the 448 value, sent as 447 = D (Proprietary/Custom) with 452 Party Role = 3-ClientID. Secondary Client ID — Secondary customer identifier associated with the order. Enter the customer's legal entity identifier (LEI/Short Code). Source of the 448 value, sent as Tag 447=N with 452 Party Role = 3-ClientID.
- Client ID Type — Identifies the type of client submitting the order. Select either "Firm" or "Natural Person".
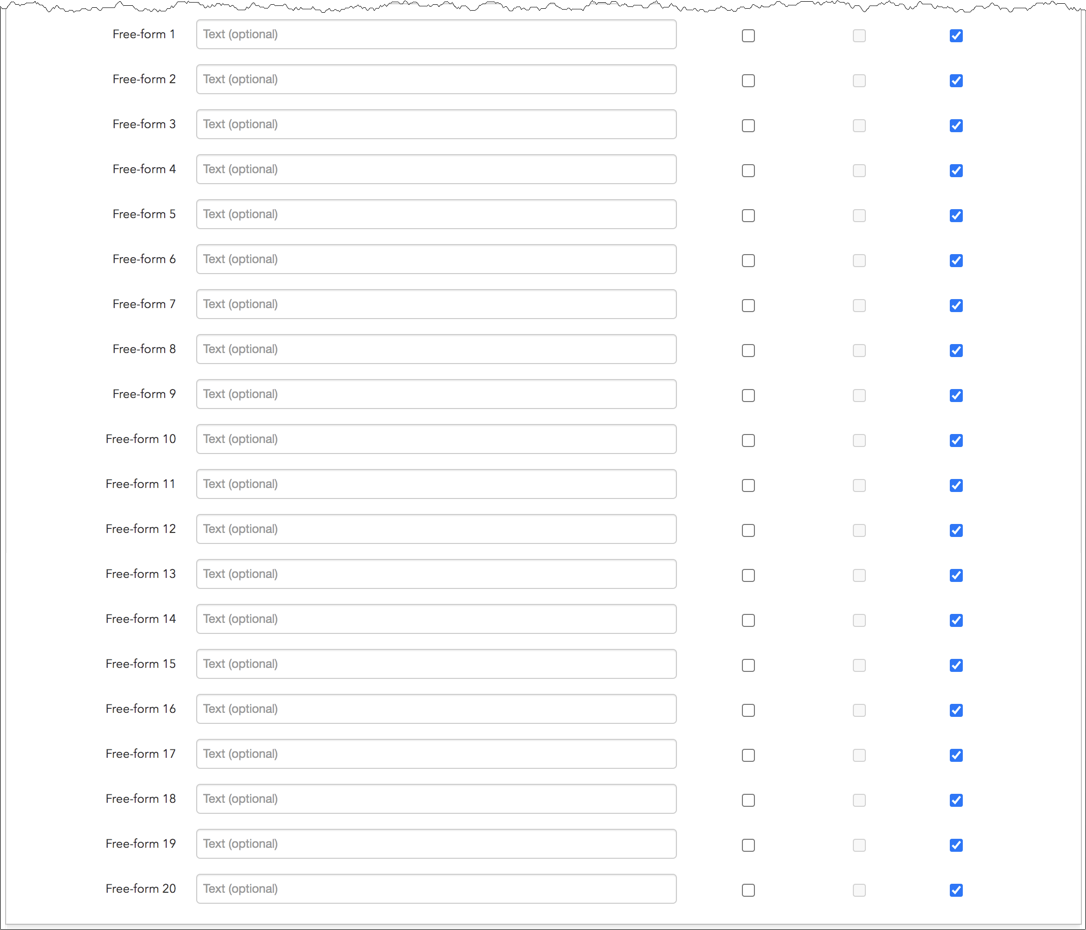
- Free-form 1-20 — Optional, user-defined text fields that can be populated for TT and FIX client application users. These values are not sent to the exchange, but are visible in the Order Book, Fills, and Audit Trail widgets and on FIX Drop Copy records.
- Apply to all sub-accounts — Allows a company creating a sub-account or sharing an account with another company to apply the parent account exchange field to the sub-account. This ensures that any sub-accounts added to the shared parent account cannot have a different value in this field and that the value is sent to the exchange. Check the checkbox next to each field to apply its value as needed. When checked, the value cannot be changed on any sub-accounts added by your company or a shared company.
- Lock sub-accounts — Allows a company creating a sub-account or sharing an account with another company to lock the value in a sub-account exchange field even if the sub-account is configured with a more specific order tag default match. This ensures that any child accounts (sub-accounts) created from the shared parent account cannot have a different value in this field and that the value is sent to the exchange. When checked, the value cannot be changed on any sub-accounts added by your company or a shared company. Note: The Apply to all sub-accounts setting must be enabled for the field in order to enable the Lock sub-accounts setting.
- Client Can Override — Determines if a user can override the value in this field when submitting orders from trading applications or APIs. Check the check box to unlock the field and allow a user to override the value. When unchecked, the field is locked and the user cannot change it.
- Click Save Changes.
Note: Not applicable for LME.