Coinbase
Coinbase Setup Guide
As a risk administrator or trader with administrator permissions, you can use the Setup application to quickly and easily set up your connection to Coinbase.
You'll need to perform the following at www.coinbase.com before setting up users in TT:
After you or your firm has been added as a "company" in TT and you've ensured your browser meets the system requirements for accessing the platform, you can login and begin setting up Coinbase traders in TT by:
- Creating a Coinbase connection
- Creating a TT account for Coinbase
- Creating a Coinbase trader ID
- Creating a Coinbase user
Creating a Coinbase API key
After users in your firm create a Coinbase wallet and fund their Coinbase account, they can create an API key, API secret, and passphrase that they'll need for their trader IDs on TT.
As a risk administrator for a company (e.g., proprietary trading firm), each user in your company needs to provide you with their Coinbase credentials if each user is going to trade using their own Coinbase account. To set up users in your firm to trade using the same Coinbase account, create multiple API keys and secrets for the same Coinbase account and passphrase, and assign each unique combination of API key, API secret, and passphrase to each user in your firm as a trader ID in Setup.
If you trade for yourself and have full administrator permissions in TT, you'll be able to create your own Coinbase credentials for your Coinbase account and assign them in TT using the Trader IDs tab in the left navigation panel.
To create a Coinbase API key:
Log in to pro.coinbase.com if you are a TT Crypto user, or prime.coinbase.com if you are a trading firm user.
Note: If you are creating an API key for the Coinbase "test" environment as a TT Crypto user, log in to public.sandbox.pro.coinbase.com/. If you are a trading firm (instituional) user, log in to https://public.sandbox.prime.coinbase.com/ to create an API key for the test (Simulation) environment.
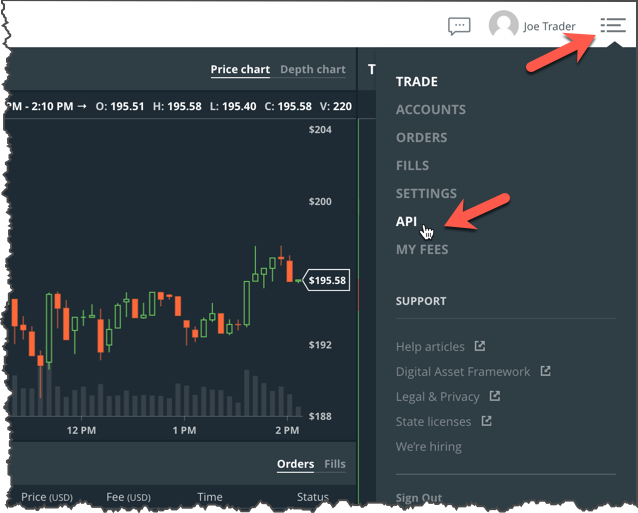
To create an API key, hover on the list icon on the right corner of the Exchange screen and select API.
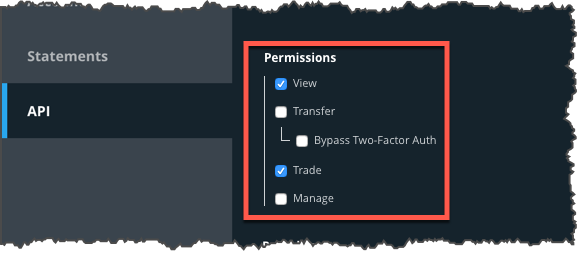
- Click the Permissions checkboxes to set the API key permissions.
After setting the permissions, click Create API Key to create and display the API key and API secret. Record or store the passphrase, API key, and API secret on your computer or device.
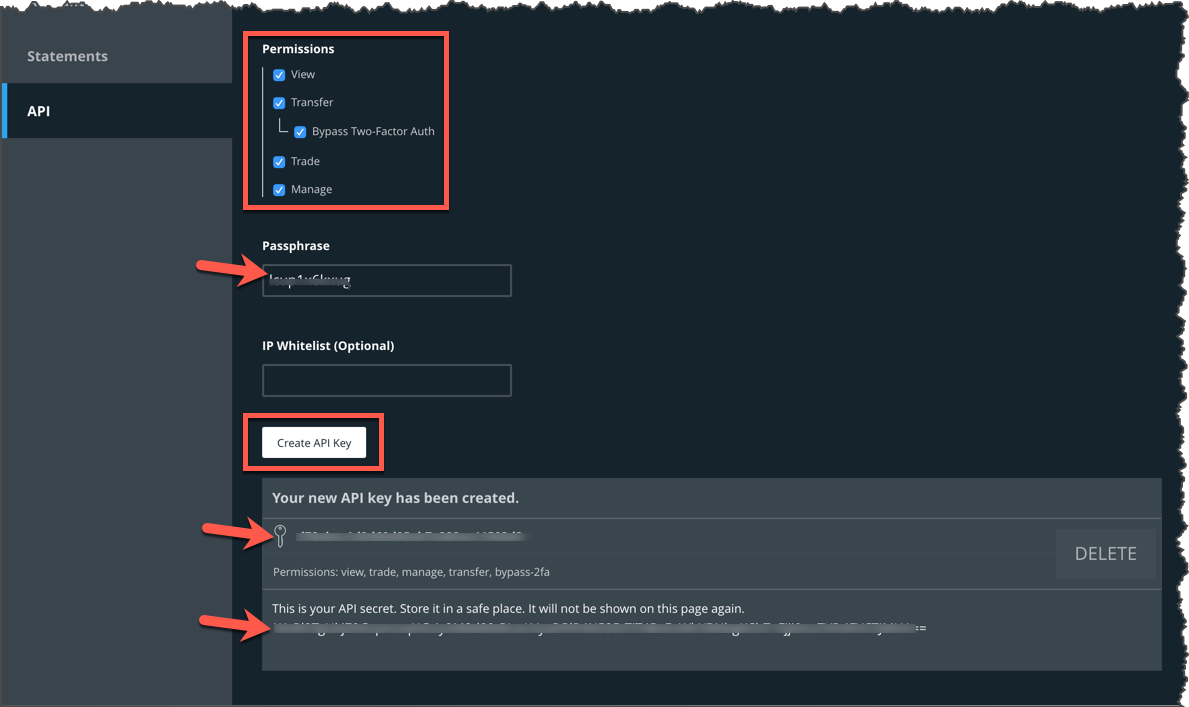
- Repeat this step to create additional API keys and secrets for the same Coinbase account if needed.
Note: If you do not have administrator permissions in the Setup application on TT, then provide your risk administrator with your API key, API secret, and passphrase. If you trade for yourself and have administrator permissions in Setup, you can log in to the Setup application and create your trader ID for connecting to TT using your API key, secret, and passphrase.
Creating a Coinbase connection
Multiple users in your company can share the same Coinbase connection, but each user is required to have their own Coinbase credentials. Coinbase exchange connection credentials (API key, secret, and passphrase) are configured per user using the Trader IDs tab in the left navigation panel.
Note: The Coinbase connection in TT will not become active until a Trader ID is assigned to the user of the connection. The Trader ID is used to make the actual FIX connection to Coinbase.
To add a Coinbase connection:
- Click Connections in the left navigation panel.
- Click +New Connection
- Configure the settings in the General Settings section:
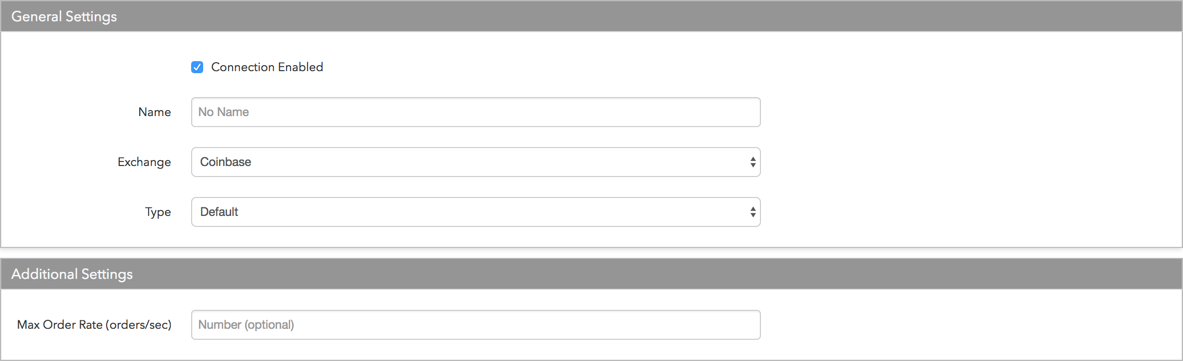
- Connection Enabled: Check this setting to activate the connection. Uncheck to deactivate the connection.
- Name: This is a required field for creating a connection.
- Exchange: Select Coinbase. Only one exchange is allowed per connection.
- Use the default setting in the Type field.
Configure the following Coinbase setting in Additional Settings:
Max Order Rate — Sets the maximum number of orders per second that a user can enter per connection. This limit cannot exceed the exchange-defined order rate maximum.
Click Create. You can select the connection in the data grid and review the connection settings in the Settings tab.
Click the Accounts tab to assign an existing account to the connection. Multiple accounts can be added to a single connection.
Note The connection will not become active until at least one account is assigned.
- Click Save Changes.
Creating a TT account for Coinbase
A TT account is required for trading on the TT platform.
The Setup application supports tiered risk and account hierarchies. That is, you can create an account for routing and clearing as well as create sub-accounts for that account.
To create an account:
- Add a new account and configure Coinbase settings for the account
- Set up position risk limits for the account
- Set up credit limits for the account
- Set margin limits as needed
Assign a connection to the account
Note: You must assign at least one account to a connection before the connection can become active and available for trading.
Creating a Coinbase trader ID
In TT, a trader ID is essentially your connection to trading Coinbase. The Coinbase trader ID is configured using the Coinbase credentials created for your Coinbase account. Before you begin, ensure that you have the following Coinbase credentials:
- Key — Sets the user's Coinbase API key.
- Secret — Sets the user's API secret.
- Passphrase — Sets the user's API key passphrase.
To create a trader ID:
- Click the More | Trader IDs tab.
A list of existing trader IDs that you currently manage appear in the left navigation pane.
- Click +New Trader Id at the top of the Trader Ids screen.
- In the Exchange field, select "Coinbase" from the drop-down menu.
- Configure the following trader ID settings:
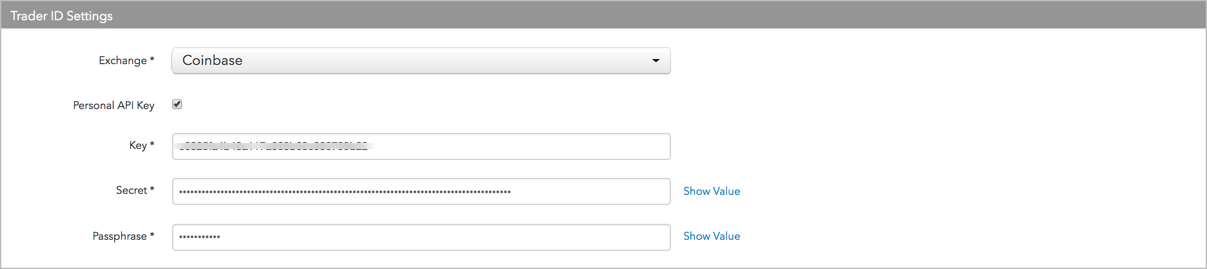
- Exchange — Select "Coinbase". This is a required field.
- Personal API Key — Sets the API Key security permissions. If checked, then this API Key can only be used by the user creating the key. If unchecked, the key can be assigned to a non-administrative user. Once the key is assigned to a user, it cannot be reassigned.
- Key — Sets the user's Coinbase API key. This is a required field.
- Secret — Sets the user's API secret. This is a required field.
- Passphrase — Sets the user's API key passphrase. This is a required field.
- Click Create
- Click Save Changes.
Creating a Coinbase user
As a risk administrator, you can set up members of your trading firm to trade Coinbase using their own Coinbase accounts or using the same Coinbase account.
If setting up users to trade using their own Coinbase accounts, ensure that you have each user's Coinbase credentials (API key, API secret, and passphrase) in order to configure their connection to Coinbase using the Users | Exchanges (Coinbase) | Trader IDs tab.
If setting up a group of traders to use the same Coinbase account, as a risk administrator you'll need a unique combination of API key, API secret, and passphrase for each user of the shared Coinbase account and create a trader ID for each user. Each trader ID can use the same Coinbase account passphrase, but with a different key and secret.
Note: In order for users to share a Coinbase account, create unique API keys and secrets using the same passphrase, and assign each unique combination of passphrase, API key, and API secret to each user as their trader ID.
As a trader with administrator permissions, use the Users | Exchanges (Coinbase) | Trader IDs tab to assign your Coinbase API key, secret, and passphrase for your Coinbase account to a trader ID in TT. You'll use your trader ID to connect to your Coinbase account to trade via the TT platform.
To configure user access to Coinbase:
- Click the Users | Exchanges tab for a user selected in the data grid.
- Click the exchange list drop down arrow, and scroll to and select an exchange.
Configure the following Order Routing settings:
- Text A — An optional, user-defined text value that remains on submitted orders in the TT system, but is not sent to the exchange. Alpha-numeric and special characters are allowed.
- Text B — An optional, user-defined text value that remains on submitted orders in the TT system, but is not sent to the exchange. Alpha-numeric and special characters are allowed.
- Text TT — An optional, user-defined text value that remains on submitted orders in the TT system, but is not sent to the exchange. Alpha-numeric and special characters are allowed.
- Max Order Rate -- Sets the maximum number of orders per second that a user can enter per connection. This limit cannot exceed the exchange-defined order rate maximum.
Click the Market Data tab to allow or deny access to market data for the following product groups:
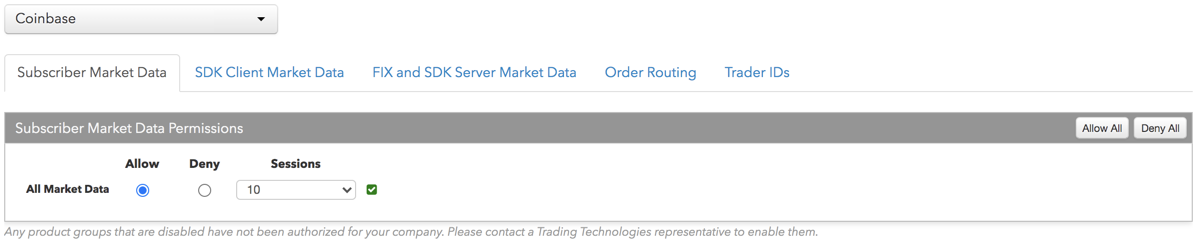
- All Market Data — Click either radio button to Allow or Deny access to all market data available from the exchange.
- Sessions — Sets how many simultaneous market data sessions the user can have active using different IP Addresses/Applications. Delay Only: Indicates that market data is denied in all environments except the delayed environment, which does not have access to real-time market data.
-
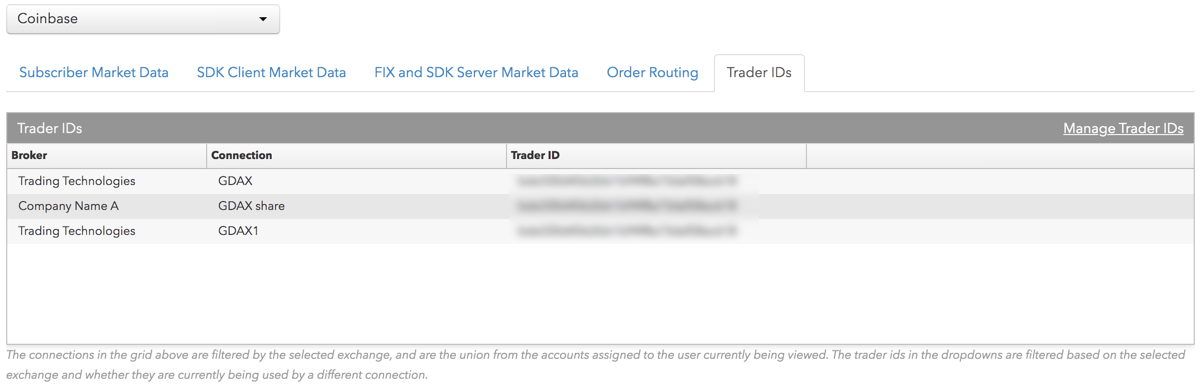
Click the Trader IDs tab and click an entry in the Trader ID column or click Manage trader IDs at the top of right of the table to add a trader ID.
Trader IDs are added by configuring the following settings on the More | Trader IDs tab in the left navigation panel:
- Exchange — Select "Coinbase". This is a required field.
- Personal API Key — Sets the API Key security permissions. If checked, then this API Key can only be used by the user creating the key. If unchecked, the key can be assigned to a non-administrative user. Once the key is assigned to a user, it cannot be reassigned.
- Key — Sets the user's Coinbase API key. This is a required field.
- Secret — Sets the user's API secret. This is a required field.
- Passphrase — Sets the user's API key passphrase. This is a required field.
You can also select Add New from the trader ID selector when clicking a field in the Trader ID column to create a new trader ID.
- Click Save Changes.
-
Optionally, you can also go to the Accounts page and click the Users tab to assign a user to an account
- Set user-based risk limits in addition to the account-based position limits as needed
- Set the user's trading or administrative permissions