Users
Assigning and managing user accounts
The Setup application allows you to manage accounts assigned to users, as well as users assigned to accounts. For example, as a company administrator, you can view all authorized users of an account and add/remove access to one or more users. You can also view all accounts that a user can trade with and add/remove one or more accounts for a single user.
Assigning accounts to a user
Use the Accounts tab on the user's screen to assign an existing order routing, clearing, or internal (non-order routing) account to a user and set their permissions for using the account. If an account is assigned to a user, they also have permissions to use any sub-accounts for that account.
Users can be assigned to child accounts, however, they cannot be assigned to a parent account and separately to only one of the child accounts. If two users are assigned to the same account, both users can view all order activity in that account.
To assign accounts to a user:
- Click Users in the left navigation pane.
- To select a user, click the check box next to a user in the grid. Multiple users can be selected.
- Click the Accounts tab for the selected user and click the +Add button in the Accounts section.
The Select Accounts screen appears.
Click on one or more accounts in the Select Accounts screen and click Select.
The selected account is displayed in the Accounts section. The Order Permissions and Additional Permissions sections also appear for the selected account.
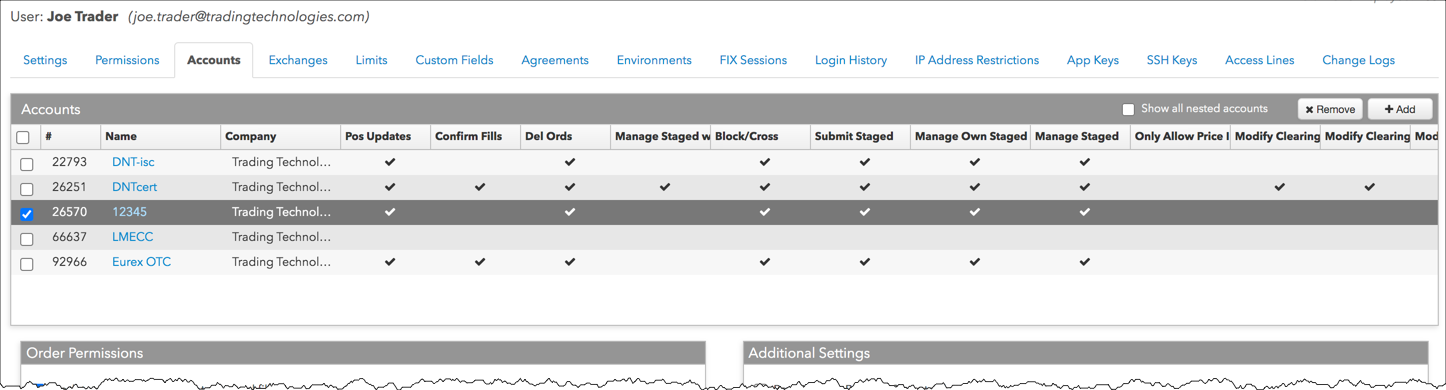
Note: If an account name is listed in the Inherited column, it indicates that the user assignment and permissions for the selected account were "inherited" from this parent account.
- Set the following user order permissions for using the account:
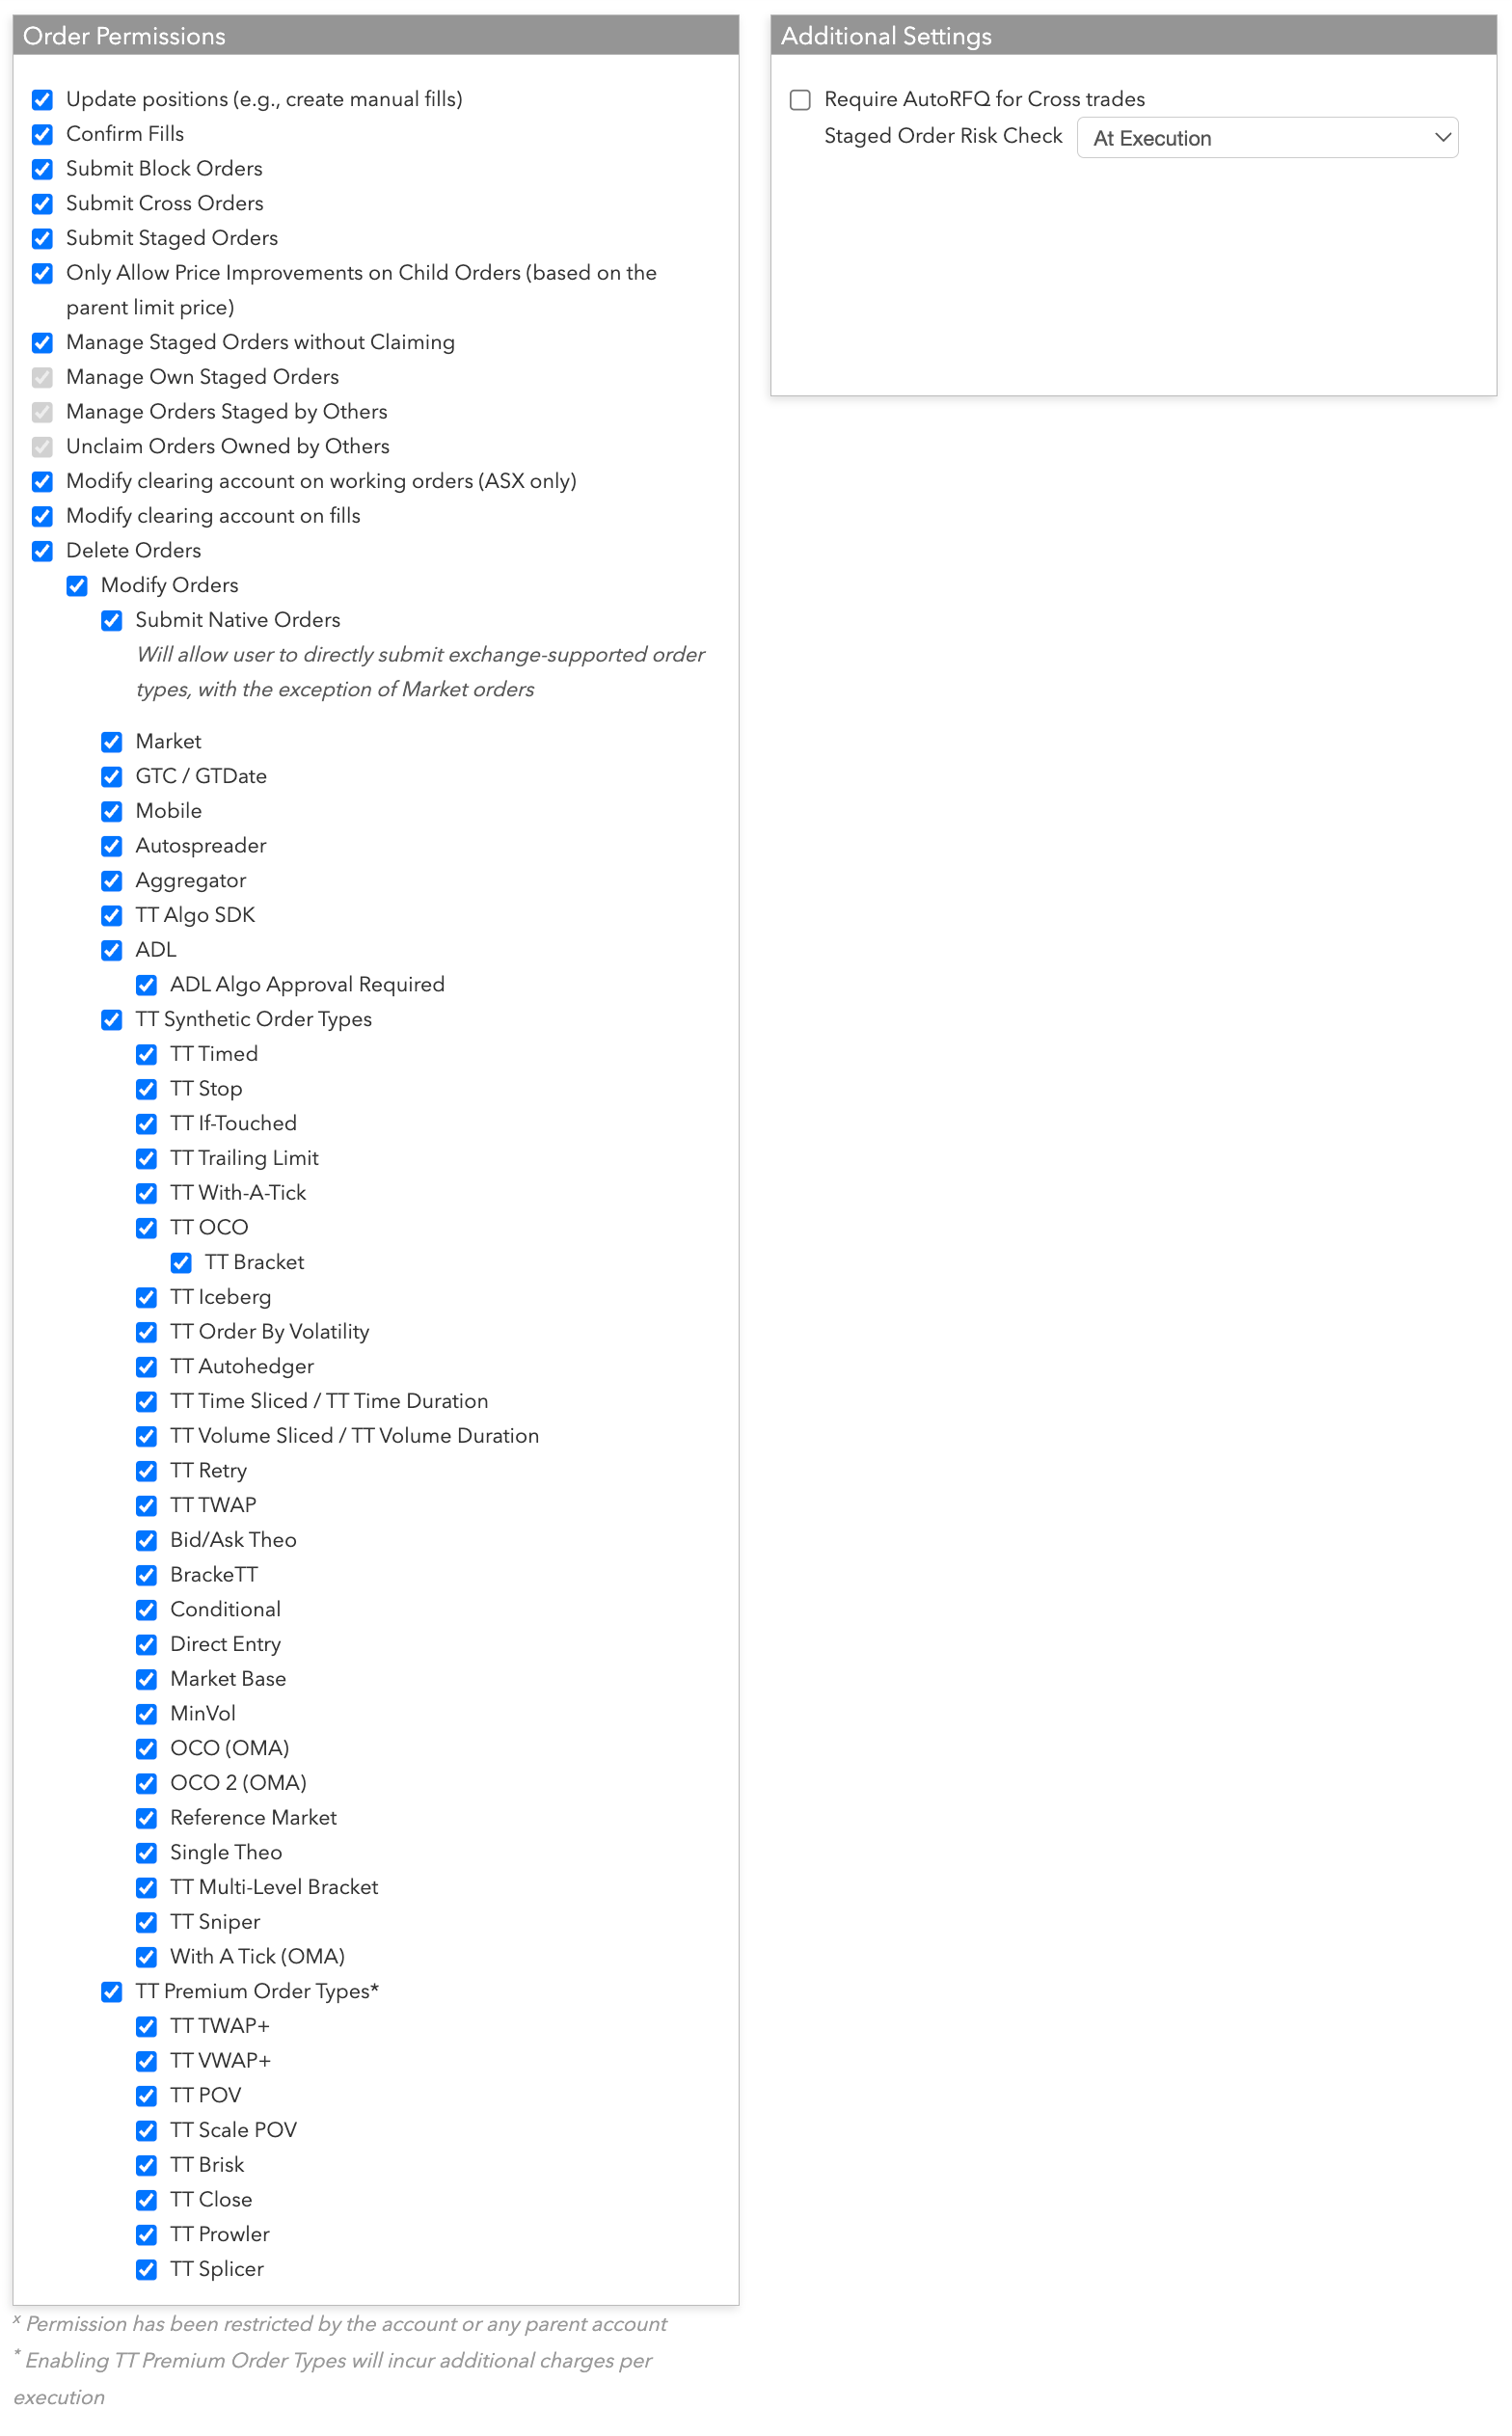
- Update Positions (e.g., create manual fills) — Allows the user to enter manual fills/corrections to this account.
Note: Account permissions apply to the parent account as well as any sub-accounts.
- Confirm fills — Allows users of the account to confirm fills.
- Submit Block/Cross Orders — Determines whether the user can submit Block and/or Cross Wholesale trades. This setting is not related to AOTC functionality.
- Modify clearing account on working orders (ASX only) — Allows the user of this account to modify the exchange clearing account on a working order at ASX.
- Modify clearing account on fills — Allows the user of this account to modify the exchange clearing account on a fully or partially filled order.
- Delete Orders — Allows the user of this account to delete orders when trading. This option must be checked (enabled) before enabling the order entry settings.
- Modify Orders — Allows the user of this account to modify working orders. This option must be checked (enabled) before enabling the order entry settings.
-
Submit Staged Orders — When this option is checked, it allows the user to place a staged order into the selected account and sub-accounts.
A user can view their own staged orders. As the staged order is filled, the user receives fills in the staged order's original account, even if the child orders for the parent staged order are executed in different accounts by the owner who claimed the staged order. Risk limits are applied to the user and user's account that submitted the staged order.
-
Only Allow Price Improvements on Child Orders — Restricts care order owners from changing the Limit price on child orders to be worse (i.e., cannot buy higher or sell lower) than the Limit price sent on the original parent care order. When the checkbox is checked, the owner can only better the trade for child orders. When unchecked, the owner can also better the trade for the parent care order. This setting is unchecked by default, and owners can change the price of both the parent care order and child order regardless of the parent order Limit price.
Note: To use this setting, you must also disable the Manage Staged Orders without Claiming setting. In order to be "held to price", you need to operate in an "ownership" model where you need to claim an order first before you can work it
-
Manage Staged Orders without Claiming — Allows a user to have full access to care orders regardless of the claimed/unclaimed state of the order. Check the checkbox to enable this option. When enabled, Manage Own Staged Orders, Manage Orders Staged by Others, and Unclaim Orders Owned by Others are also enabled by default.
-
Manage Own Staged Orders — When this option is checked, it allows the user to manage (i.e., claim/unclaim and potentially execute on-behalf-of) their own staged orders that were submitted into the selected account and sub-accounts.
In order to view an inbound staged order, potential owners must have this option set and have access to the staged order account. All orders in the account, both staged and non-staged orders, are viewable by all users assigned to the account.
When unchecked, this option prevents a user from claiming his own staged orders.
Uncheck this setting and check Manage Orders Staged by Others to allow users to only manage orders staged by others.
Note: To set this option, the Submit Staged Orders option must be checked.
-
Manage Orders Staged by Others — Allows the user to manage (i.e., claim/unclaim and potentially execute on-behalf-of) any staged orders submitted into the selected account and sub-accounts that he did not submit. If Submit Staged Orders and Manage Own Staged Orders are also checked, then the user can also manage his own submitted staged orders.
In order to view a staged order, potential owners (i.e, users that claim staged orders) must have this option set and have access to the staged order account. All orders in the account, both staged and non-staged orders, are viewable by all users assigned to the account.
If you want to restrict which contracts a user can submit as staged orders, the risk limits should be set on the user, the user's account, or the user's parent account.
If position transfer is enabled on a parent or child account with a claimed staged order, then the owner (user who claimed the staged order) can manually choose to do a position transfer with his own account and the staged order account if they are both in the same position transfer-enabled account hierarchy. This creates two opposing manual fills that leaves the originator (user who submitted the staged order) with the position he wants and the owner with an opposing position.
When the owner executes on behalf of a staged order, all of the limits on the owner’s execution accounts that were used for the child orders, and any parent accounts of those execution accounts, are applied. The originating user's limits are not applied at this time, as the originator’s limits have already been checked when the order was staged.
Note: To set this option, the Submit Staged Orders option must be checked.
-
Unclaim Orders Owned by Others - Allows a user to unclaim their own staged order that has been claimed by another user. This will force the claimed care order back to “Available” status.
Note: This setting is enabled by default when Manage Staged Orders without Claiming is checked.
- Submit Native Orders — Allows the user of this account to directly submit exchange-supported order types with the exception of Market orders. If checked (enabled), select Allow or Deny for the following:
- ADL — Determines whether the user can deploy strategies to Algo SE servers. Includes ADL algos, TT Synthetic algos, and Autotrader.
- ADL Algo Approval Required — Determines whether the user can submit ADL algo orders on the account without approval. When this option is unchecked, the selected user does not require approval for algos on the selected account.
- TT Algo SDK — Determines whether the user can deploy TT Algo SDK strategies to Algo SE servers.
- Autospreader — Determines whether the user can deploy synthetic spread strategies to an Autospreader SE server.
- Aggregator — Determines whether the user can submit orders for aggregated instruments.
- GTC/GTDate — Determines whether the user can submit Good til Cancel and Good til Date orders.
- Market — Determines whether the user can submit Market orders. When Deny is selected, the user cannot submit any Market order types, including: Stop Market, Market If Touched, or Market-To-Limit.
- Mobile — Allows or disallows trading via mobile access to the TT platform.
Note: This setting also also allows you set up different permissions on mobile accounts vs. accounts used for desktop trading.
- TT Synthetic Order Types — Determines whether a user can submit TT synthetic order types with this account.
- TT Premium Order Types — Determines whether a user can submit TT Premium order types with this account.
- Require AutoRFQ for Cross trades — When checked for a user or an account, this setting forces an RFQ prior to submitting a cross trade. Only a company administrator can enable this setting for a user/account in their company.
- Staged Order Risk Check — When checked, this option is set to:
- At Execution — Risk checking is applied to the staged order account when related child orders are executed.
The following care order (also known as staged order) permissions are set when assigning an account to a user, or assigning a user to an account.
- Update Positions (e.g., create manual fills) — Allows the user to enter manual fills/corrections to this account.
- Click Save Changes.
Managing user accounts
Tip: After selecting a user from the User Grid, you can hover on an account name in the Account Table and click the "open in new tab" icon to view/change/modify the account's settings without closing the user window. Use command-click (Mac) or Crtl-click (Windows) to open the accounts tab and remain on the user screen.
Modifying account permissions for a user
To modify account permissions for a user:
- Click Users in the left navigation pane and select a user.
- On the user's page, select the Accounts tab
- Click the checkbox next to the account name listed in the Accounts section.
The Order Permissions and Additional Permissions sections appear.
- Modify the applicable permission settings and click Save.
The modified permissions also appear in the Users | Accounts tab.
Removing an Account from a User
Use the Accounts tab to remove (unassign) existing accounts from a user.
To remove an account from an user:
- Click Users and then the Accounts tab.
- Select one or more entries in the Accounts section and click the Remove button.
Note: Removing a parent account from a user also removes all child accounts from the user.
- Click Save changes.