Alert Manager and Alert Viewer
Creating an alert
Use the Alert Manager to open the Alert Detail screen, which is used for creating your own custom alerts. Using the Alert Detail screen, you can create logic that determines when an alert is triggered based on order activity, positions, and algo behavior. For example, you can create an alert for when your orders get filled, or when your P/L falls below a certain amount in all of your trading accounts.
When creating an alert, you can also set whether to send the notification to your desktop or mobile device or both, as well as create your own custom notification messages.
Note: Price alerts are not supported on TT Mobile.
Create Price Alert from Widget:
To create an alert:
- In the workspace menu bar, click Widgets | Miscellaneous | Alert Manager to open the widget.
- Click
 at the top of the Alert Manager.
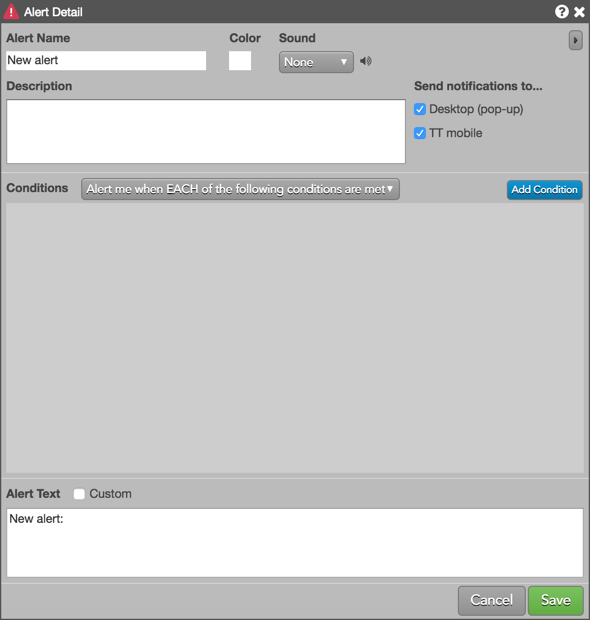
The Alert Detail screen appears.

Tip: TT provides some common alerts to use as templates when creating your own alerts. Click the drop down arrow in the New Alert button to use one of these templates.
- In the top of the Alert Detail screen, set the following options:
- Alert Name — Enter a name for the alert.
- Color — Click to select a color to display on the alert notifications.
- Sounds — Click to select a sound to play when the alert appears in the workspace.
- Description — Enter an alert description that appears in the Alert Manager.
- Send Notifications to: — Sets where to send alert notifications. By default, pop-up alert notifications are sent to your desktop and push notifications are sent to TT Mobile when an alert is running. To disable sending notifications, uncheck either the Desktop or TT mobile option.

- In the Conditions section, click the drop-down list and select the condition choice for the alert:
- Alert me when ALL of the following conditions are met — Sets the alert to trigger when all of the alert conditions are met.
- Alert me when ANY of the following conditions are met — Sets the alert to trigger when at least one of the alert conditions is met.

- To add a condition type for the alert, click Add Condition and select one of the following:
- Order — Allows you to create an alert for entering and managing orders.
- Position — Allows you to create an alert for monitoring your P/L and open position in one account or all accounts.
- Algo — Allows you to create an alert for your algos based on account, algo status, or algo name.
- Price — Allows you to create an alert for changes based on contract prices.

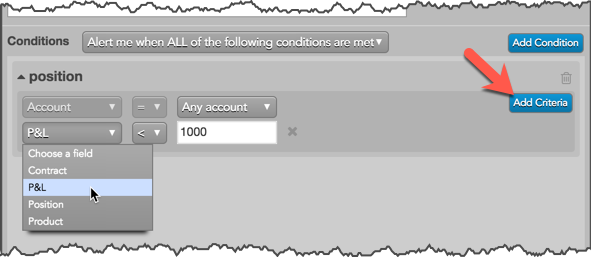
Click the drop-down lists to choose a field, select an operator, and select a value. Fields and values vary based on the condition type being added.
As you add a condition, click Add Criteria to add logic to the alert condition type as needed.

For a description of each alert condition field, refer to Alerts Reference.
If needed, click the x to remove the criteria or
 to remove the condition.
Note: The condition choice selected for the alert (e.g., "Alert me when ALL of the following conditions are met") applies to the condition only and not to the criteria within a condition.
- Optionally, click Custom to add your own alert text.
Otherwise, leave this unchecked and use the default alert text that appeared when you added your alert conditions.

- Click Save.
The alert appears in the Alert Manager.